Update: This is a deprecated tutorial, since Blender 2.5.x has a different UI now, while it can’t export in Quicktime anymore, and its AVI codec exporting selection dialog is currently broken…
Blender, the well known 3D application, has a Video Sequencer Editor (VSE) that allows for some video editing. It ain’t easy and intuitive using it, but it’s there. For those who can’t find any other free HD-capable editor for their system, it might prove to be a good solution. I am a newbie in Blender usage, but by spending quite a few hours experimenting and reading the manual/tutorials online, I got a good grasp of how its basics work, so I thought I share that knowledge. You will need a modern PC, 1 GB of RAM, 1280×1024 monitor resolution or more, and a 3-button mouse with a wheel.
Preparation (needs to be done only once)
Install the latest stable version of Blender. Download the right pre-compiled package of plugins for your architecture and unzip these files somewhere easily accessible (e.g. either the Blender folder, or your user folder, or your video folder).
Load Blender maximized. On the top of the application notice the first drop-down menu and in there select “SR:4 – Sequence”. This will put your Blender layout in a video editing layout. Grab the edge of that whole menu (the gray menu strip across the top of your Blender window) at the point where the cursor becomes a double-arrow and push it down. A secret window compartment will show up. Click “View & Controls” and change the “Select with:” from “right mouse” to “left mouse”. Close back that compartment.
On the bottom of Blender click “Do Sequence”. Then hit the very last button on the bottom right that reads “HD” (that is, if your footage is HD, modify to use the appropriate resolution for your footage if you don’t use full HD). For “frs/sec” select 30 for NTSC or 25 for PAL or 24 for film. On the “Game framing settings” select “stretch” and “pageflip”, and change the 800×600 resolution listed there to the one of your monitor (for example, I personally use a 1680×1050 monitor and that’s what I put there).
On the menu bar above, click “Playback” and make sure that “set frames/sec” is the same as the frame rate you set earlier. On that menu also select “Sequencer Windows”. On the right side of that menu change the “End:” number to 9999 and then click to select the “playback and sync with audio…” volume icon on the far right.
On the menu bar above that, click “Add”, “Movie and Audio HD”, and navigate to the folder that you usually store your video. From the main menu on the top menu bar select “Save default settings”. Now say “Cancel” to the “open movie” dialog. Re-save the “default settings”. What we did here was to force Blender to “remember” your movie folder for future usage. Blender saves a “.B.blend” file for these user settings under a hidden folder called “.blender”, so if you ever upgrade your OS or move ot another PC, you can just move that file over and Blender will re-remember your settings.
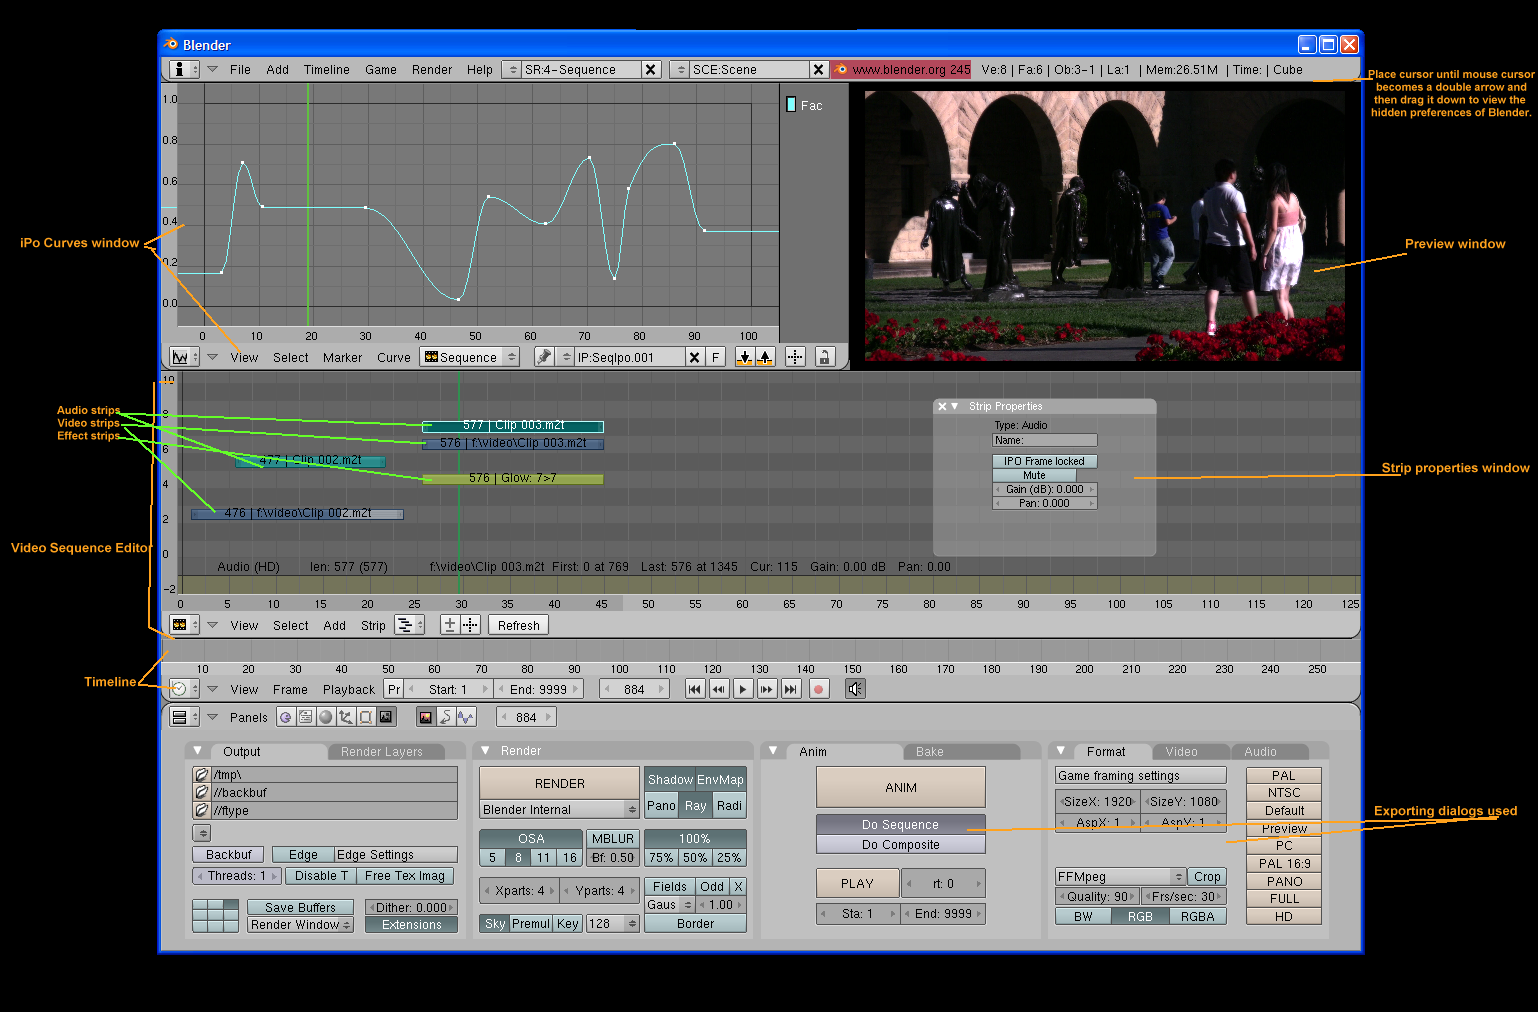
The Video Sequence Editor
Click again “Add” and “Movie and Audio HD”, and load a video clip. In Blender’s terminology the clips/events in the timeline are called “strips” and the audio/video tracks are called “channels”. By default, Blender imports audio and video separately, so if you want to move both at the same time so you don’t lose sync, you must SHIFT+click both of them and then press “G” on your keyboard. Now both strips are movable in the timeline at the same time. To delete a strip, select it and press “X”. To cut the strip at the current timeline cursor press “K”. You can “Undo” an action with CNTRL+Z. For more operations click the “Strip” menu below the timeline.
If your footage is interlaced (has jaggies) and you want to edit in progressive mode, select the video strip with the mouse, and press “N”. A properties window will open, where you can click “FilterY”. On the same little properties window you will also find the “reverse” option if you want to playback the video backwards. If you don’t want to do that for each and every clip in your timeline, edit in interlaced mode, and export in a progressive format at the end (if this is supported by the exporting codec).
Right-click anywhere in the gray background to move the “timeline cursor” — the change will reflect in the top-right window which is the “video preview” window. If you can’t view the whole video picture in the preview window, simply use your mouse wheel to make the preview fit the window. The wheel of the mouse is an important tool on Blender. For example, click the gray timeline that has your strips in it and move the mouse wheel. Then click the mouse wheel and move the mouse. Or press CNTRL+click-wheel-button to see what that does in the timeline. So next time you don’t know how to do things as there are no menu items for everything, try the mouse buttons and wheel, with CNTRL, SHFT and ALT buttons. Blender is very shortcut oriented.
Now, try to open a second movie strip. Place it in the Blender timeline above or below the first one. Unlike on other editors, I don’t recommend placing clips next to each other because they don’t “snap” together (at least not without using weird shortcuts). So place the new strips towards the end of the previous strips, but on different tracks/channels. The strips that are towards the bottom have priority in rendering if they overlap.
If you don’t want to do the mistake of un-syncing audio and video by mistake, you can select both strips with SHFT, click the “Strip” menu and select “Make meta strip”. This will force Blender to see your audio and video strips as a single entity. If you want later on to make more editing in it, select that meta strip, then “Strip” and then you select “Enter/Exit meta strip”. This will put you in a new virtual timeline where only that meta strip’s strips will be visible and editable. You can then press again the “Enter/Exit meta strip” to exit to the regular timeline where all your strips and meta-strips live happily together.
If you want to do slow-motion of fast-motion, select the little arrow on the sides of each strip and drag it left or right. A “ghostly” strip is left behind to show you how big the strip was originally, in case you ever want to put it back to its normal playback mode. Finally, if you want to select lots of strips at once, click “Select” menu, “Border select” and then drag the mouse around how many strips you want selected.
For background music in addition to another audio track (e.g. narration), use the iPO curve editor (explained below) to change the volume of each strip. This way you can blend two different audio tracks. As for other audio options, go to the panel at the bottom and click the last toolbar icon, the one that has the tooltip of “Sound block buttons”.
Save your video project regularly, as Blender doesn’t ask if you want to save it if you press “quit”. It also crashes sometimes with HD files, so better safe than sorry.
The Effect plugins and the Ipo Curve Editor
The way you add a video plugin/effect on Blender is this. Select the video you want, and then press “Add”, “Effect” and then the one you want. If you choose “Plugin” from that menu you can navigate to the place you saved the plugins your downloaded at the very beginning of this article. Each effect will show up as a new strip on top or below your video strip. Some effect strips need to be above and some above the main video strip in order to work — experiment with each. You can also select these effect strips and press “N” to bring up their properties window, if they have one.
If you want to do a transition effect you place the second video strip on a channel/track atop the first video strip, but not aligned. Only about 1-2 seconds of each clip should be vertically aligned. Then, you select an Effect again and you place it in the middle track of the videos strips. If you start moving one of the video strips, you will see that the effect strip will become bigger/smaller too, as the effect strip is the binding force between the two video strips now.
As noted above, some effects have their properties panel by pressing “N”. However, some of them can be controlled via the Ipo Curve Editor, at the top left of Blender. The black rectangle border represents the currently selected strip in the timeline. So, select an effect strip or an audio strip and then press CNTRL+right-mouse-click somewhere in the iPo editor. Do this again some more at different points. This will create a waveform effect that will make the audio strip’s volume fluctuate throughout the timeline, or make the effect’s strength weaken. Think of it as keyframe editing for effects.
The playback Timeline and Extended Editing
Below the editing timeline there is smaller one. This controls the playback of the video and creates new markers. Make sure the “End:” value on that menu has the same number in it as the last frame of the whole Blender timeline. Otherwise, when you try to play back your timeline, or even when you export, Blender will stop at that specified frame and won’t render/playback the whole timeline.
Now, as to how to add things like text and graphics, you need to load your GIMP, create the text as transparent PNGs (at the video project size), and then import those to Blender. If you want animation, rotation, split screens, scrolling credits etc, then you will have to sit and learn the rest of Blender — the 3D part of Blender. It won’t be easy, but at least you would know that your text and effects can’t be matched by After Effects or any other commercial video editor (text tutorials here and here). When you do create the 3D scene with Blender in one of its other modes (the non-video editing mode), you bring it into the timeline by pressing “Add” and then “Scene”.
Exporting with Blender
The exporting is done by the two last blocks of buttons on the bottom of Blender. From the drop down codec menu select FFmpeg. When you do that, two new tabs appear, “Video” and “Audio”. In there, you can select what codecs you want. For example, for h.264, select Quicktime Format, H264 Codec, and a bitrate that is suitable for the resolution of your video (e.g. 3 mbps for widescreen DV, 5 mbps for 720p, 10 mbps for 1080p, etc). On the Audio tab select AAC when you export as Quicktime h.264 and click the “multiplex” button if/when it’s offered (otherwise audio is ignored in the exporting process).
There are other exporting options too, e.g. the lossless Huffyuv AVI codec, XViD etc. Remember, some of these codecs are not de-interlacing automatically, and so some of your exports might end up being full of jaggies if you haven’t de-interlaced the strips one by one in the timeline as I mentioned above.
So, when you have selected your exported settings, go to the block of buttons on the left of the exporting options, make sure “Do Sequence” is selected, and then press “ANIM”. This will encode the video and export it in the /tmp/ folder somewhere (unless you put it to save it elsewhere in the block of buttons on the bottom left of Blender).
The future
The new version of Blender, v2.46, is coming soon and there is some rework of the FFmpeg support, there is Proxy support if your PC is not fast enough for HD editing (this uses small video copies to edit while the final export will use the high resolution versions of your video), while the strip’s “properties” dialog that we were bringing up above by pressing “N”, will now be as part of the bottom half of the Blender window, after you press that new movie icon in the toolbar (you’ll know when you see it ;). There is also snapping between strips if you select a strip, press “G” and then keep pressing CNTRL to snap it to another element in the timeline. More info here.
I would like to see a global de-interlace button in the export settings just so we don’t have to de-interlace manually each clip in the timeline, faster M2T and MTS/M2TS editing support (M2T editing is currently very slow compared to other editors on the same PC), a mouse context menu that list basic operations for the timeline strips and the iPo curve editor, and ability to change the transparency of a video strip by using the iPo curve editor. Then, we are talking business.
Additional reading: Blender’s VSE manual, and another tutorial.


