The following guide will create for you an h.264/AAC 720p HD file in the MP4 container using KDEnLive. The file will be compatible with Vimeo HD, YouTube HD, the Sony PS3 and the XBOX360 among other devices. And if you modify the exporting method to be PAL, and bitrate at 4000 kbps, then it can be compatible with the AppleTV too. The article assumes you already have installed KDEnLive itself and its dependencies.
First, you need to install the full version of ffmpeg. Ubuntu and most other Linux distros do not include some of the codecs needed, for legal reasons. So, follow the tutorial here and install the full ffmpeg version. I chose the “B” method, which is the most official way of doing things. If you are not running Ubuntu, then you will have to literally hunt online for such an ffmpeg version. Google is your friend.
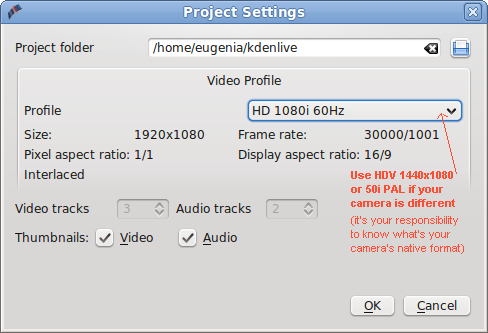
Then, load KDEnLive and setup the project properties, in a manner similar to the way shown below. You must select the right Profile. There are different profiles for full HD, HDV, 720p, progressive, interlaced etc. You must know what kind of properties your source footage has. If you don’t, you can be assisted by importing one such file on KDEnLive, right clicking on it, selecting “properties” and reading there its actual properties, although that dialog doesn’t give you all the info you need. Long story short, learn how your camera shoots as.

Then, edit as usual, and save often as KDEnLive is not known for its stability.
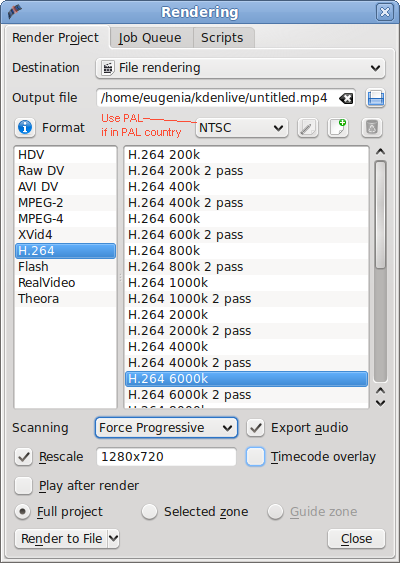
When you are done with editing, click the big “Render” button in the toolbar, give a name to the file, and make everything else look like this:

Use PAL if your camera is PAL, NTSC if your camera is an NTSC one, or, create a new profile using the + icon on the right if you want to export in 24p. Then, “Render to file”.
![]()


