What a huge success these Canon dSRLs are these days! Everyone with a little interest in filmmaking now hurries to acquire one of these cams too. The problem is that the h.264 format these dSLRs (and other HD digicams and digirecorders) are recording is not exactly “friendly” on the PC side. Here’s a guide on how to use that h.264 dSLR/digicam format properly with a PC editor.
1. Install the software
I will be using Sony Vegas Platinum in this article, because it’s the only consumer video editor that supports 24p editing — a key feature that these dSLRs have is 24p recording. Platinum is in my opinion the most powerful consumer video editor, and costs ~$75. Yes, I could suggest a professional editor here, but honestly, Platinum does most of what you’ll ever need to do, for a fraction of the price.
Please note that Vegas Platinum 10+, and Vegas Pro 10+ do offer better support for these h.264 files, so you might not need to use this tutorial at all if your editing is stable/fast-enough. But it’s definitely a must-read tutorial if you use an older version.
2. Shoot the footage
There are three things you should setup in your camera: frame rate, exposure, picture style. If you’re shooting a music video or film go for 24p/25p, if you’re shooting sports go for 50/60p, and if you’re shooting daily random stuff go for 25p/30p. Either use manual exposure to setup your shots, but if you’re not very accustomed on how to do that, just use automatic exposure, but make sure you actually “lock it” (so the brightness doesn’t jump in the footage every time your scene changes). Finally, go for a flatter picture style, or if you prefer more punch, use the built-in “Neutral” style. Definitely don’t go for the over-the-top “Standard” default style though, it’s color-ungradeable. Looks too video-y.
If you’re using a plain HD digicam from Canon, also ease-up the colors, and always lock exposure (read the manual on how to do that).
When done shooting, create a folder on your computer that will host all the project files. Copy the MOV files in there from your flash card.
3. Transcode your footage
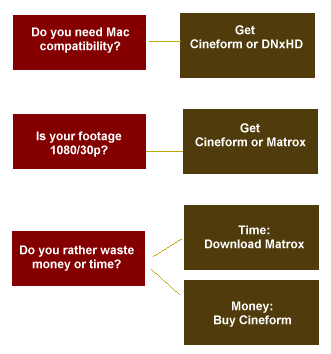
PC editors just don’t deal fast-enough with the Canon MOV format. Some editors do better than others, but if you want 24p, you’ll have to stick with Vegas Platinum — and in that case you’ll have to transcode to an easier-to-decode “intermediate” visually-lossless format. I would suggest Cineform NeoSCENE ($100), but if money is an issue, you can go with the freeware AVID DNxHD, or Matrox MPEG-2 i-Frame HD codecs. Here is a comparison between the three:
– Cineform is much faster to encode during transcoding,
– Cineform is much faster to decode/playback,
– Cineform hits some bugs on Vegas Pro 9 or later,
– AVID DNxHD has slightly better quality (not noticeable usually),
– AVID DNxHD is free,
– AVID DNxHD doesn’t support 1080/30p frame rate, or 1080/50p/60p,
– Matrox I-Frame is free,
– Matrox I-Frame is in between DNxHD and Cineform in regards to overall speed,
– Matrox I-Frame supports up to 300 mbps bitrate, so quality is ok too,
– Matrox I-Frame method is a bit more difficult to setup and batch-encode your files into,
– Cineform and DNxHD work on a Mac too, Matrox doesn’t.
You might also hear others suggesting the Huffyuv or Lagarith intermediate formats. I’d suggest against them, since they’re slow as molasses, even on the fastest PCs. Others, might suggest you go with the Proxy method, but again I’d suggest against it, because when you do the final switch to the original MOV files, you will get more frequent crashes than usual during exporting (especially on more complex projects).

So, once you’ve made your decision between the three intermediate formats, here’s how to use each:
3a. Cineform NeoSCENE
Download and install NeoSCENE (use the trial version first, to make sure it works on your system, and if it does, uninstall properly before installing the purchased version). Load the utility, load its preferences, and make sure you’re using the AVI format, the path to the folder you created on step #2, “High” quality, and the “maintain source format” option. Then, load the MOV files to the utility, and start the conversion. This will create AVIs on the same folder, typically at double the filesize (it’s normal for intermediate formats to create large filesizes). Conversion will be rather fast. Please note that Vegas Pro 9 has a bug with Cineform, and sometimes it creates red/blank frames in the timeline, so be aware of it. Pro 7/8 and Platinum 8/9 don’t have this problem. Finally, if you’re not using a Pro 9 or later released version, you will also need to rename the cfhd.dll file to cfhd.dll-OLD (found in your Vegas installation directory), in order to force Vegas to use the newer codec that gets installed with NeoSCENE (by default, older Vegas versions use an ancient decoder).
3b. AVID DNxHD
Here’s a step-by-step tutorial on how to install the codec (need to be done only once), then batch-convert dSLR footage into AVID DNxHD. Just make sure you select the right frame rates/resolutions in the dialogs, depending on how you actually shot. Also, create these DNxHD MOV files into a sub-folder in the main project folder, because otherwise you wouldn’t know which MOV files are what format.
3c. Matrox MPEG-2 I-Frame HD
Here’s a quick rundown on how to setup your machine in order to batch-encode your files into this codec. It requires some understanding of what you’re doing, and some moderate PC usage though. Update: A different, simpler way to convert to Matrox’s AVI. This makes the Matrox AVI solution not as time-consuming anymore.
NOTE: Make sure you don’t have both Matrox AVI and a Cineform decoder installed on the same PC, at the same time. When you do that, you’ll get red/black frames and crashes with recent Vegas versions. So only have installed one or the other, depending on your project.
4. Load footage into Vegas
Load Vegas. After the initial screens go away, load the Cineform or Matrox AVIs, or the DNxHD MOVs, into Vegas’ “project media” tab (you can drag-n-drop them). IF you are using Cineform, you must do a one-time check. You must check if Vegas recognizes these AVIs as progressive or as interlaced. Because the AVI format does not have a field for field order, it’s up to you to instruct Vegas what kind of files these are. So, follow this tip on how to do that. When you do that, come back to read the rest here.
5. Setup Project Properties
In Vegas, it’s very important to have the right project settings before you start editing. From the main menu select “Project Properties”, and a new dialog will pop up. In there, click the right outmost icon called “Match Media”, the one that looks like a yellow folder. From there, select one of the files you will be editing with (Cineform/Matrox AVI or DNxHD MOV), and click “open”. Vegas will now automatically fill up most of the project settings for you, after analyzing the video file you picked. After it does that, you need to do a few changes manually to that dialog: For the de-interlacing option select “none”, and for the Quality option select “Best”. You can save a new template with these settings, so each time you start a new project with the same kind of resolution/frame-rate, you can just pick it from the list! So, after your project settings are set, click “Ok”, and edit as you would normally do. Save often. Here is my Vegas getting-started guide.
6. Ensure visual quality
After you have edited, select ALL clips in the timeline (e.g. by using the SHIFT key), right click, select “Switches”, “Disable Resample”. By disabling resample we ensure no ghosted final image (especially if you used slow-motion). I have more such cool tips here, that you should read.
7. Export
Export your final for YouTube/Vimeo/PS3/AppleTV/XBOX360 from this tutorial, by just using its step 3 (or step 4 if you have access to the SONY AVC encoder via Platinum version 9+). That exporting tutorial is for 720p, but it’s easily converted to 1080p: just change the resolution to 1920×1080, and the bitrate to 12 mbps. Everything else remains the same as in the tutorial.
If you’re after DVDs, then use the right MPEG2 widescreen template on the “RENDER AS” dialog. This will export video only. For audio, use the AC3 template. Then, bring both files into DVD Architect (companion application to Vegas Platinum), and DVDA will put the two back together.
If you’re after Blu-Ray or “AVCHD disks”, just use the option from the main menu. If you get crashes with the Sony AVC encoder when burning HD, change the burning encoder setting to “Main Concept”.


