Note: This tutorial is for AVCHD cameras, for HDV look here.
Introduction (article updated constantly)
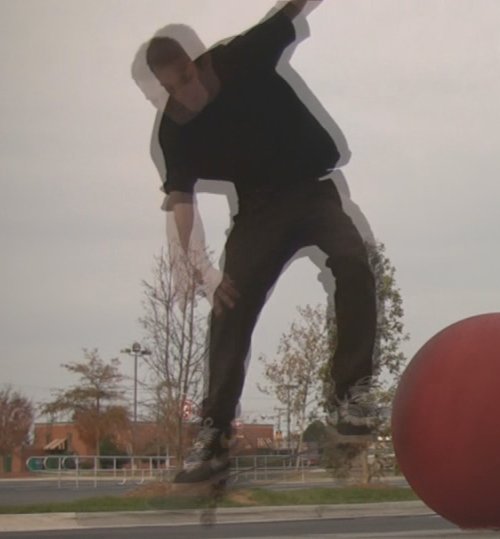
Canon’s consumer HD cameras have 24p support, only that it’s not a… truly true 24p. It’s PF24, which incorporates both progressive and interlaced frames in a 60i stream. To get the pure 24p stream out of it, you need to do a “pulldown removal” (aka “inverse telecine”). PAL users do not need to do this because their PAL cameras don’t have a PF24 mode — this burden is only for NTSC users who manually chose to shoot in the PF24 mode. If your final output is the TV (e.g. via DVD or the camcorder itself), and as long as you never de-interlace that footage during editing/exporting, then you don’t need to remove pulldown. But if your output is not a home DVD/TV but the web, or a PC, or other non-TV viewing device, then you better get to work and remove pulldown because your footage will have an ugly “ghosting” effect whenever there is motion on the screen. Here are pulldown-removed images before & after, showcasing the problem and its fix. Here’s another example showing the problem.
There are several ways to remove PF24 pulldown for the Canon HDV cameras, but their AVCHD cameras (e.g. HG10, HR10) did not enjoy the same fate, until now. If you are using the latest versions of After Effects or Final Cut Pro, then you can use the tutorials linked to remove pulldown (although I have not confirmed that these tutorials will work for AVCHD formats as well). On the PC side, the cheapest, fastest and cleanest way to do it, would be to purchase the Cineform NeoSCENE tool for $129. Highly recommended.
However, there is another way, a freeware method, as long as you already have a video editor that supports the AVCHD format, DirectShow/VfW and 24p (e.g. Sony Vegas/VMS, AE/Premiere, Avid etc). Please note that Premiere Elements, Pinnacle, Magix Movie Edit Pro and Ulead don’t support true 24p so avoid these for 24p editing. Premiere Elements can do 24p editing only after installing a 24p Premiere Pro template file from Adobe’s site. The following method is an involved procedure to follow and it requires some very basic usage of the DOS prompt (found in Windows’ Accessories program menu as “MS-DOS”), but if you have no money and you need it done, it should work fine as long as your clips are not too long (tested with HG10’s PF24 files). Longer clips (over 3 minutes or so) might crash the mencoder utility used below, or create A/V sync issues. If you really need this done the proper way, use AE/FCP, or buy Cineform NeoSCENE.
Windows XP/2k/Vista
Method 0 (for Vegas users only)
Read about it here. Come back to this article to use another method if this one is not good enough for you.
Method 1
1. Install Avisynth.
2. Download and unzip the TIVTC v1.05 plugin. Inside that zipped folder, you will find a file called TIVTC.dll. Drag-n-drop that .dll file on the C:\Program Files\AviSynth 2.5\plugins\ folder. Vista/XP 64bit uses a different path.
3. Unzip ffmpeg somewhere.
4. Install Avid’s DNxHD PC codecs at the bottom of this page, (or Huffyuv).
5. Download and install the latest ffdshow version.
6. Unzip the Batch Intermediate Creator somewhere (thanks goes to Khaver, read discussion in that link).).
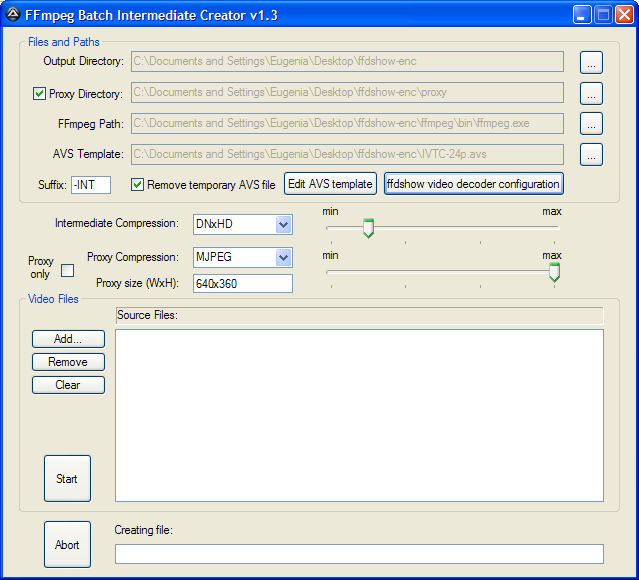
7. Load its ffmpeg-bic.exe application and fill up what it needs to know, like in my screenshot here.
8. Click the “ffdshow video decoder configuration” and make sure the “deinterlacing” checkbox is checked. Also, make sure that ffdshow is the default .m2ts/.mts decoder in your system (you can set the h.264 codec in the ffdshow configuration panel to “ffmpeg-mt”). Otherwise, it won’t work correctly.
9. Add some PF24 files, and start the process. This will create either Avid DNxHD .mov files, or Huffyuv .avi files at 23.976 fps, progressive. I would suggest you go with the Avid DNxHD codec.
The setup as shown in the screenshot also creates proxy files — smaller versions of these big 24p intermediate files that are too slow to edit. Here’s how to use proxy files with Vegas. It is possible to tweak that proxy editing tutorial for other 24p-capable editors too. You can uncheck the proxy-related checkboxes to not create any proxy files.
This method works with *some* AVCHD formats from some manufacturers. Others crash. You will have to try to see if it will work with your AVCHD format or not. If they don’t work, use method 2.
Method 2
1. Download the plain version of Mplayer for Windows and unzip it somewhere that you can find back easily. Inside that unzipped mplayer folder, create a folder named “input”, and a folder named “output”. This action only needs to be done once for your system.
2. Download the Huffyuv lossless codec. Unzip the .zip file on your desktop, right click on the huffuyv.inf file and select “Install” (note: Vista might not give you that option, in which case manual registration of the codec’s DLL file must happen via the DOS prompt, google it). After about 15 seconds, you can delete these files from your desktop, as the Huffyuv lossless codec is now installed on your system. Open a DOS prompt and navigate to the mplayer folder (e.g. “cd C:\Mplayer\”, without the quotes). There, run this command: vfw2menc -f huff -d huffyuv.dll -s settings.mcf and on the new dialog that pops up select: “Predict median (best)” from the first drop down menu, and “<-- Convert to YUY2" from the second drop down menu, while leaving unchecked the other options. Then click "ok" to discard the Huffyuv configuration dialog. This action only needs to be done once for your system.
3. Download the Lagarith lossless codec. Unzip the .zip file on your desktop, right click on the lagarith.inf file and select “Install” (note: Vista might not give you that option, in which case manual registration of the codec’s DLL file must happen via the DOS prompt, google it). After about 15 seconds, you can delete these files from your desktop, as the Lagarith lossless codec is now installed on your system. Open a DOS prompt and navigate to the mplayer folder (if it’s not open already at that folder). There, run this command: vfw2menc -f laga -d lagarith.dll -s settings.mcf and on the new dialog that pops up select: “YUY2” from the “Mode” menu, and “Use Multithreading” if your CPU is hyperthreaded/multi-CPU or it has more than one Core (leave unchecked if you don’t know). Then click “ok” to discard the Lagarith configuration dialog. This action only needs to be done once for your system. Note: Do not change to YUY2 if you are using Adobe’s editors, as they don’t understand that format.
4. I will work with Vegas on this step because that’s what I use, but it should be similar for Premiere/AE/Avid. Open Vegas and load your PF24 .m2ts or .mts AVCHD files in the “Project media” bin. Make sure that these files were indeed recorded as PF24 (don’t mix 60i and PF24-recorded files), and that your hard drives are formatted in NTFS. Then open the “Project Properties” dialog and use the HDV 1080/60i template from the drop down menu. Now you have two options, either pull all your scenes at once in the timeline to export, or export them one by one. The first method does not require your attendance, but it will produce one large file that will have no scene detection, while the second method will produce lots of per-scene files, but it will require that you be in front of your computer quite often to export the scenes one by one. Think hard of what your needs are, and make your choice. I would personally recommend you export the scenes one by one mostly because this way you can avoid the possibility of the audio and video getting out of sync (plus, MEncoder is known to not handle huge files too well either).
5. Once the clip(s) are on the timeline, hit “File” and “Render As”. Select .avi for the “Save as type”, and the “HDV 1080-60i intermediate” template. Then, hit “Custom”. On the first tab select “Best” quality. On the video tab leave everything as is except the video format, select there “Huffyuv v2.1.1”. Then, hit “Configure” and a new dialog pops up. There, make sure that “Predict median (best)” from the first drop down menu, and “<-- Convert to YUY2" from the second drop down menu are selected (leave unchecked the rest of the options there). Then click "ok" to take that new dialog away. Leave unchanged the "Audio" tab, and then hit "ok" in the "custom template" dialog. Then, you must give a name to your .avi file. If you chose the "one big file with no scene detection" method give it any name you want (as long as there are no spaces), but if you chose to export the scenes separately then use the same filenames as in their original AVCHD files, but with the .avi extension this time, and with no spaces in the filename. Export the files in the "input" folder you created inside the Mplayer folder.
6. After all the exporting is done, open a DOS prompt, navigate to the Mplayer folder that has the mencoder.exe file in it, and then run the following command, substituting each time the right input/output filenames with your own video filenames:
mencoder input/INPUT_FILENAME_001.avi -aspect 16:9 -fps 30000/1001 -oac pcm -vf detc,scale=1440:1080 -ofps 24000/1001 -ovc vfw -xvfwopts codec=lagarith.dll -o output/OUTPUT_FILENAME_001.avi
If you are proficient with DOS scripting, you can even write a script that will automatically read all the files on the “input” folder and export them one by one without requiring your attendance. Phoric wrote such a script and sent it to us (save it down and put it in the mplayer folder before you execute it). Thanks Phoric!
7. After MEncoder is done re-encoding all your files, you can choose to delete or move away the .m2t files on the “input” folder (so they don’t mix with video files you will place there in the future), while all the .avi files found on the “output” folder are now ready to edit! Windows Media Player won’t recognize these files as widescreen, but don’t worry, they are widescreen: Vegas will recognize them as such (if not, just set manually the clips’ aspect ratio to 1.3333). Create a new project in Vegas (or any other 24p-enabled video editor), select again the HDV 1080/60i template, but change the following this time: Field Order should be “progressive scan”, frame rate should be “23.976” (type it if it’s not in the list), rendering quality “Best”, and de-interlacing method “none”. Then, edit as usual and enjoy true 24p!
NOTE: Trevor Marshall suggests an alternative method (not tested by me, might have an audio sync issue).
Mac OS X
1. Download, unzip and drop the MEncoder files for Mac OS X on a folder of your choice, e.g. on one that’s called “mplayer”. Create two folders in that folder, one called “input” and one called “output”. This action only needs to be done once for your system.
2. Use a Quicktime-enabled application (any will do, as long as it has access to Quicktime’s exporting dialogs) to export your AVCHD files as MJPEG/PhotoJPEG inside the “input” folder. MJPEG is not exactly a lossless codec, but it’s the only high quality near-lossless codec that comes out of Quicktime that MEncoder will support.
3. By using OSX’s Terminal.app, navigate to the mplayer folder (it requires basic understanding of Terminal usage), and then use the following MEncoder command line to remove pulldown and export in Huffyuv, like this:
./mencoder input/INPUT_FILENAME.mov -aspect 16:9 -fps 30000/1001 -oac pcm -vf detc,scale=1440:1080 -ofps 24000/1001 -ovc lavc -lavcopts vcodec=huffyuv:pred=0:format=422P:vstrict=-1:aspect=16/9 -o output/OUTPUT_FILENAME.avi
You need to manually replace the filenames for INPUT_FILENAME and OUTPUT_FILENAME for each of your files.
4. After all the encodings are done for all your files, you can safely delete the files inside the “input” folder. Your final, true 24p files to be used with editing can be found on the “output” folder.
5. Install the “Perian” utility which will enable Quicktime-enabled video editors to read and edit these created Huffyuv .avi files. This action only needs to be done once for your system.
If you are proficient with Bash scripting or AppleScript, you can write a script that will automatically read all the files on the “input” folder and export them one by one using MEncoder without requiring your attendance. If you write such a script, please send it to me to incorporate it in this tutorial and help others. Please note that iMovie and Final Cut Express don’t support true 24p editing, so if these are the only video editors you got, then either don’t bother removing pulldown, or buy a PC to do the job (it will be cheaper to buy a fast PC with 2 GB of RAM and Vegas Platinum and use that as a dedicated video station, than buying Final Cut Studio or After Effects for the Mac).
Linux
There is no way to apply this method under Linux because MEncoder crashes when you try to read an AVCHD file, while ffmpeg has a known bug in the reading of such files that results the video to export twice as long as it should. As of this writing, no Linux library or application can read AVCHD files properly.
Important Notes
1. Admittedly, this is a slow way of doing things. For 1 hour of footage, it will take between 8 and 10 hours to complete the various exports, depending on the speed of your computer. If time is money for you, buy Cineform’s NeoSCENE. If not, let it run overnight. A trick you can do to speed up the various exports is to have the input and output files on different hard drives. For example, when exporting the AVCHD files in the beginning, have the AVCHD files on one drive, and export into the “input” folder of MEncoder on another drive. Then, while using MEncoder, encode the “output” files back to the first hard drive again. This can save up to an estimated 15% of time in the overall process because the hard drive’s head won’t jump like crazy back and forth to service both the input file reader and the exporting encoder, but instead each hard drive will dedicate itself to a single action.
2. You will need a lot of storage. We are talking about 180 GBs per 1 hour of footage, because there are two stages of Huffyuv/Lagarith encodings going on. After the export to the “output” folder is done, you can delete the files found on the “input” folder, in order to save some storage space. Always keep around the original AVCHD files though.
3. Editing Huffyuv or Lagarith files can be pretty slow, because their filesizes are so large. You can choose to edit them directly and be done with it, or export again in Cineform 1080/24p/progressive through Vegas/VMS’s .avi custom codec dialog, and then edit these Cineform files instead. It’s pretty fast to re-encode in Cineform, its format is fast to edit too, and because all these codecs are visually lossless you won’t see much of quality degradation after all these exports. Another way to deal with this problem is to use proxy files (faster way). But I leave this decision to you as to in which format you want to edit with, because exporting and re-exporting until you reach a fast codec can be nerve-wrecking.
4. Vegas Platinum 7/8 won’t export in full 1920×1080 (limited to 1440×1080 export size), so you will need to use either the “SUPER” or “Handbrake” freeware utilities, to go around the problem and export in full 1080/24p. Vegas Platinum 9 and Pro don’t have this limitation. If you are ultimately exporting for Vimeo’s glorious 720p HD web service, check my tutorials here.


