Author Archive

Pulling a Vancouver in Mexico

As you might know, all the “cheaper” TV series and budget-minded movies are usually shot in the various studios around Vancouver, Canada. Geographically, it is a pretty good location as it’s near to the US border and it has access to the sea while the Vancouver island in front of it cuts down most sea winds. Only problem is that it rains a bit too much and that shows in a lot of series that are filming outdoors (e.g. first few seasons of X-Files).

There is however, a cheaper way to do all this at a place that has an LA-style weather. I think that either the Mexico government or a big corporation should step up and create big studios in Tijuana, north of Mexico, and aggressively advertise it. The city is right at the border with US and only 2 hours away driving distance from LA, while it has a similar housing structure and it’s quite modern as it’s one of the most touristic places in the world. This can be a huge alternative for the big LA studios. They have easier access to these studios (especially if the Mexican government makes it easier for LA actors/cargo to move freely in the borders — it’s on their best interest anyway), it has much better weather, and all that at HALF the price of what they can get from Canada (maybe even cheaper). These days the Canadian dollar is dangerously close to the US dollar, so I can tell you that the dough the LA studios were saving by filming in Canada is quickly fading away. The answer is Mexico now, at least until the US dollar finds its way up (hopefully it will do if we get a clueful president next year).

At the beginning the studio doesn’t have to be super-modern. Cheap semi-professional Canon, Sony or Panasonic cameras will do just fine (the ones that Indies use, cost between $3000 and $8000), there is no reason for the $130,000-a-pop Varicams. No-name starring US actors that are not paid more than $5,000-10,000 per TV episode are also easy to get from LA (they will beg you for a job anyway). Every weekend they can even drive back to LA to their families, which is so much faster than flying back and forth from Canada! The actual employees at the studios, e.g. hair, makeup, cameramen etc, can all be Mexicans which will be paid at a normal-for-Mexico rate, but low compared to US/Canada equivalent employees. And if Mexico plays it clever, they can even established their own, cheaper, SFX company in Tijuana and produce the film/series from start to finish. Indie US directors can even find a pretty good career there, getting paid about $5,000 per week. Overall, you should be able to produce a Galactica-quality TV series at half the price.

I can tell you right now, if I had a few million dollars I would be starting a major studio business in Tijuana, Mexico, trying to “pull a Vancouver” with the LA sharks. The way their business is going bad with piracy/dollar-value these days, they would be coming crawling to save a few bucks in the production, I can assure you of that. I just hope that the Mexican government or entertainment corporations wake the hell up.

Update: Searching, I only found this small studio located there which it doesn’t seem to be doing a good job selling itself to the rest of Hollywood, possibly because it’s owned by FOX who have under-utilized it in the past few years.

Color Correction with Sony Vegas

Almost 1/3 of the pictures we snap usually need color correction. 99% of the users never do color correction, but when you shoot something like this, maybe you want to invest 3 minutes to correct it. Photoshop and Gimp have good color correction tools, but I am usually using Vegas these days for my video projects (that sometimes also need color correction). There are many ways to do color correction with Sony Vegas, but this is how I do it — and it seems to work for me.

Load the media you want to color-correct on the timeline and the apply the “Color Corrector” filter on your picture/video. There is a color-picker icon on the bottom-left of the “High” color wheel. Click it and then using the mouse pointer-turned-picker click on the whitest point in your picture that is well-lit. Then, use the picker on the bottom left of the “Mid” color wheel and pick a white point in your picture that might be in the shade and not well-lit (e.g. the white part of people’s eyes, or the fold of a white t-shirt). Then, click on the bottom left of the “Low” color wheel and either find the most dark “white” point in your picture (e.g. a person with a white t-shirt that’s in the background in a dark shade), or click on an actual dark point in your picture. You will have to play around with that last picker, I found that in some situations picking dark white points works best, while for others it works best to pick actual dark/black shadowy elements.

Here’s my before and after of a bunch of very old copyright-free images (1, 2, 3) that were shot on film and have suffered with the passage of time. However, remember that while old film pictures can be salvaged this way, modern digital pictures/video also require color balancing sometimes. I had some great results color balancing this picture with Vegas, but I can’t upload it as it’s a copyrighted image.

Update: Most of HappySlip’s videos are not white balanced.

Skai channel and copyright violation?

As I am writing this as I am watching the final of the Euro-basket of men under 18 between Greece and Serbia. I was very happy to see a live feed of the Greek TV Skai channel that broadcasted the final. But 10 minutes later, I thought: I wonder what the Spanish people who sold the broadcasting rights to Skai channel would think if they knew that Skai shows their broadcasting over the internet without IP-locking. I am pretty sure that they are unaware of Skai’s IP-unlocked live TV feed over the net. As much as I hate to say it, simply because I am much enjoying watching it as I am a Greek who lives abroad and has no other way of watching the final, this would be a copyright violation IMHO.

HD-DVD: It’s a shame

I spent 3 hours searching the net for a free way to burn my camera’s HDV footage in a HD .mpeg2 non-transport format on a regular DVD using UDF 2.5 and HD-DVD’s file structure, and then playback that on an HD-DVD. You see, HD-DVD players recognize plain DVD disks with HD content burned on them, as long as these DVD disks were burned using the right HD-DVD file system/format. I have an HD-DVD player but not a burner, so using plain DVD media to burn HD files it would have been a lifesaver (plain DVD media disks can hold up to 35 minutes of HD).

There are three ways to do it currently, all commercial options, and all non-supported hacks:
1. Use DVD Studio Pro on the Mac, via Final Cut Studio ($1200) – Tutorial
2. Use Ulead + Nero ($130) – Tutorial
3. Use Pinnacle Studio 11 ($100) – Tutorial 1 and Tutorial 2

The easiest/cheapest way is the third one, but I am sold on Vegas and I can’t justify $100 for a DVD burning software that I otherwise don’t need. I had hopes that the Linux geeks would be able to hack something together by now, as the “standard profile” HD-DVD file structure is just an evolution of the DVD one and so it’s *easy* to create compared to Blu-Ray, but it seems that no one scratched that itch yet to make it happen. Eventually it will happen, but again, I am trying to get functionality out of my tools that while will be commodities in 2-3 years from now, they are not yet. I think that’s why I am getting so pissed off with software: I know what potentially *can* be done with it, but I want it done NOW.

UPDATE: It is now possible. Tutorials here and here for both Blu-Ray and HD-DVD filesystems on plain DVD discs.

From DV/HDV/AVCHD to PS3/Xbox360/AppleTV

Introduction

While there are a gazillion of video converters out there, I found none that is optimized to correctly deal both with anamorphic and interlaced video, or able to read intermediate lossless formats. There is always something that’s missing in the process of each of these utilities. It seems that all these converters are mostly consumed in transcoding pirated/DVD movies to another format rather than dealing with your home movies.

This is why I wrote the following tutorial, to show a way of how to export lossless video from your video editor (in this case Sony Vegas, although it’s similar with Adobe Premiere too) to an external converter and from there, to various formats (XViD, h.264, Flash, MP4, etc). The anamorphism and de-interlacing takes place on the video editor, so the converter only has to do that: converting. The main reason this tutorial exists is because the converter we use is more complex than most graphical converters, but it has the advantage of being able to read “lossless” codecs, which means that when you export from the video editor to the converter, you export to a special codec that loses no quality whatsoever. This workflow for videographers beats in quality any graphical converter out there.

The Method

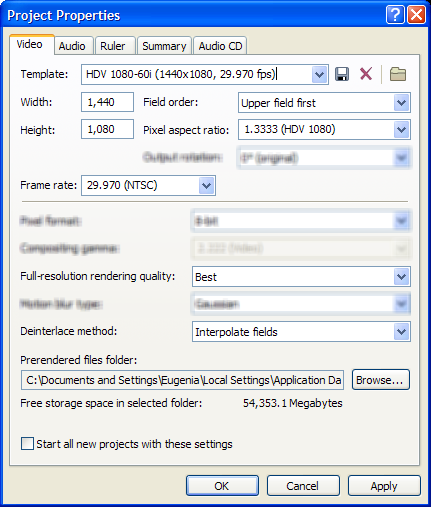
1. Install Sony Vegas Movie Studio 8 Platinum Edition ($130 or 30 days free trial, suggested system requirements here). Grab your scenes from the tape and do your video editing on that program. Please note that h.264 encodings tend to de-saturate your mpeg2 HDV footage, so use the following filter that will affect the whole timeline by saturating the colors a bit: From the “Track FX” button select the “Color Corrector” filter and then select its “Studio RGB to Computer RGB” template. Meanwhile, make sure that your “Project settings” look like this for NTSC HDV (use a DV template if your camcorder is a plain DV widescreen one, but keep the field order, rendering quality and de-interlace method the same):

[ IF you shot with a Canon HV20 or HG10 in 24p mode, you will first have to remove pulldown before you start editing your scenes in Vegas. Then, select the 23.976 framerate in the “Project Settings” window. When you are creating a new project you can tell Vegas to create custom settings as a particular file on your disk, so you just tell it to derive the right settings from your pulldown’ed 24p videos. Then, make sure that it’s “progressive scan” for the “field order”, and “none” for the “Deinterlace method”. The Platinum edition of Vegas does support 24fps, even if it’s not officially advertised as being able to. It is in fact, the cheapest NLE in the market that supports 24p editing. ]

2. Install the Huffyuv 2.1.1 lossless codec from here. You do that by uncompressing the contents of the zipped file on your Desktop, right-clicking on the huffyuv.inf file and selecting “Install”. After this is done, you can delete these files. We will be using this codec because that’s the only lossless codec that produces ‘small’ filesizes while at the same time FFmpeg (our converter) supports it.

3. Once your have a final cut on Vegas, select “Render As” from its “File” menu. Select the .avi format from the “Save as type”, and then click the “Custom” button on the right side of the dialog. On the first tab select for “Video rendering quality” to be “Best”. On the “Video” tab select the field order to be “none, progressive scan”, select the right aspect ratio for your video, and on the “Video format” select “Huffyuv v2.1.1”. Once Huffyuv is selected, hit “Configure”, which is a button next to it. In the new window popping up, select for “RGB compression method” the “<-- Convert to YUY2” option. Hit “ok” in that window to go away. Back to the main “Custom Template” dialog, hit “ok”. Now, back on the main “Render As” dialog, for file name pick the name “Untitled.avi”, then immediately hit “save” and sit back while your video is being encoded to the Huffyuv lossless format. Be aware, the file size will be pretty huge, but at least you won’t be losing any quality.

4. In the meantime, install the PS3Video9 utility from here. Navigate to C:\Program Files\Red Kawa\Video Converter\Tools\FFmpeg\ and copy away the ffmpeg.exe and pthreadGC2.dll files found there. Feel free to uninstall PS3Video9 now (I recommend against using it as it can’t deal with interlacing correctly, it has a bad ad-ridden UI).

5. If the encoding has finished, move the Huffyuv-encoded “Untitled.avi” file on the same folder you have copied ffmpeg.exe & pthreadGC2.dll at.

6. You now have several options on how to encode your final file, but I have ready for you some templates, just download them and unzip them on the same folder that ffmpeg.exe is at (zip file’s last update: Dec 11 2007). As long as your .avi file is called “Untitled.avi” too, all you have to do is double-click on the desired .bat file. Use 1080p-30.bat for PS3/XBox360 and for TVs that are actually 1080p, use 720p-30.bat for PS3/XBox360 and for 1080i/720p TVs, and use 480p-30 for EDTVs, normal TVs, the AppleTV or if your source video is DV instead of HDV/AVCHD. Of course, if your footage is 24 fps, use the .bat files that their filename has the word “24” in them instead of “30”, or choose “25” if you are in a PAL country. Other formats are also available within these templates. Encoding will take some time depending on the speed of your computer, so be patient. Make sure that no other programs are running at the time, and that you are not swapping (aka “paging”, being out of RAM).

6. Now copy the resulted file on the multimedia device you want to, and enjoy it!

Important Notes

1. My .bat files are creating optimized h.264 files in two passes for optimal quality, although you can certainly edit some of these .bat files to change some aspects of the encoding. For example, you can speed-up encoding by doing only one pass. Remove the “-pass 1” attribute from the first ffmpeg paragraph and then remove completely the second paragraph, save the .bat file and then encode. Also, you can tweak the bit-rate by tweaking the numbers of the -b and -bt attributes. You can always edit the input video filename (in my .bat files it’s called “Untitled.avi) and the output video filename etc. Finally, the -title “XXXX” attribute sets the title on the video, so replace it with your own title (e.g. “A day at the zoo”). If you are on a PAL system, change all the instances of “-r 24000/1001” (or whatever value is after the -r attribute) to “-r 25000/1001” instead.

2. You can choose to de-interlace inside Vegas as I showed above (recommended), or you can de-interlace later, through ffmpeg. If you decide to de-interlace through ffmpeg, you must add the “-deinterlace” attribute *exactly* after the two “ffmpeg.exe” words on the .bat file of your choice. It must be the FIRST argument that ffmpeg gets, otherwise its de-interlacing creates a bad ghosting effect where there is fast motion. Yeah, I know it’s weird, but that’s ffmpeg we are talking about, the king of weirdness.

3. As you noticed, I recommended you encode at 480p for the AppleTV instead of 720p. This is not only because the AppleTV supports files only up to 720/24p instead of 30p, but also because the Quicktime engine (that AppleTV uses) has real trouble decoding videos encoded with the x264 encoder. It seems that Apple has optimized their Quicktime to only playback smoothly files that were encoded with Apple’s encoder. Problem is, Apple does not provide the right tools to do what we need here (lack of de-interlacing on Quicktime Pro, FCP is expensive), but also quality of the Apple h.264 encoder sucks compared to x264 and it’s ultra-slow to encode. So, I recommend staying with my method even at the expense of AppleTV. Hopefully, AppleTV 2.0 will be better/faster in that respect. My FFmpeg templates use CAVLC instead of CABAC so this should help the AppleTV to render the files easier.

4. In the most recent versions of the ffmpeg-templates.zip file I also added a few more templates, one for the (480×270 video sized) iPhone, one for the PSP (just copy the also 480×270 file on a folder named just “VIDEO” of the root of the PSP’s memory stick — create the folder if it doesn’t exist) and one for the QVGA iPod/iPhone+Symbian (for Symbian devices that run either UIQ 3.0+ or S60 3.1+). Unfortunately, there is no way to have the same h.264 file playing on both the Apple iPhone and the Sony PSP (even if the output resolution/bitrate is the same) because they are both really picky and not very compatible as to what they are expecting. This is why there are different templates for each. Also, there is an MP4 template that will create videos for QVGA cellphones. The “PMPs-and-NokiaInternetTablets” template is for these Asian XViD PMPs that are usually sold for cheap online, and Nokia’s 770 and N800 Internet Tablets. There are also two HD templates for XViD. Finally, the “FlashVideo” template is for adding Flash video on your own web site (*not* for uploading to YouTube or other video sharing sites). For more in-depth Flash video tutorial and additional Flash templates, check here.

5. For the PS3 in particular, you can copy the encoded h.264 .mp4 files on a folder called “VIDEO” (upper case) and then burn that to a regular DVD media (as normal files, not as DVD-video). The PS3 will automatically recognize it as a video-oriented media and it will playback the HD .mp4 videos in there directly from the DVD disk. If you will burn on a CD media instead, the bitrate should never exceed 8 Mbps, or the playback will stutter.

RAZR2 V8

I received the RAZR2 V8 today for a review. My first reaction: they placed an external second screen that’s QVGA (see: expensive) and they didn’t bother to include a card slot. That’s f*cked up. It is also running Linux. That is all.

Update: Oh boy, oh boy…

The external screen gives more information about the error: “Current storage device does not have enough memory to capture media“. Please note that there is 425 MBs freely available in the phone. That’s a buggy firmware version alright.

Update 2: A reboot fixed it…

HDMI rocks

For the first time I watched my own HV20 footage on the 32″ 1080i HDTV via HDMI. In the past, I have done so only via component and while it was a good image, it was not as crispy-clear as HDMI can produce. I am in awe. It’s really amazing that these days for a thousand bucks you can buy such a high quality camcorder and for another 500 an HD TV. Broadcasters would kill for access to that technology just 10 years ago, and now everyone has access to it.

iMovie ‘08 SUCKS

Oh. My. God. How could Apple do that???

At a first glance, I got excited about iMovie ‘08. In fact, for those who read my blog posts or forum posts on video forums, iMovie is the No1 application I recommend to newbies. But not anymore.

The new version of iMovie, is completely rewritten. While they added some nice features (e.g. AVCHD), they removed some others which are simply too important to be removed. There is no timeline view anymore. There is no iDVD integration anymore. You can’t “see” your audio timeline anymore. There are no chapter markers anymore. Cutting is not precise anymore but a matter of approximation.

It’s like they took iMovie, they added a couple of flashy things, and they made it even more useless as the version of iMovie that was shipping in 2001. I am extremely disappointed by this. The only good thing is, Apple seems to know that their new version sucks, and so owners of iLife ‘08, can download for free the iMovie ‘06 version and install it in parallel (although you will have no AVCHD support with that older version). If you have a G5+ that is, as the new iLife won’t run on G4 computers.

And before you reply about Final Cut Express HD: it is now an old version, and it costs $300. On the PC side equivalent prosumer apps don’t cost more than $130 and they can do more too (e.g. Vegas Movie Studio 8 Platinum does more than Final Cut Express for less than half the price, complete with 24p and some AVCHD support). So either Final Cut Express HD must be both be updated and get a price-cut, or in my book, there is no NLE in the Mac world (except iMovie ‘06) that is useful right now to consumers.

Update: A particularly critical of the new iMovie thread over at Apple’s board was deleted by the admins. Only to see the topic sprang again within minutes. Other topics also show how problematic iMovie ‘08 is.

Color Grading Tutorial

You might have noticed that lots of Indie or amateur movies look and feel cheap. There are many reasons for this, ranging from bad sound, to shaky cameras, to poor lighting. However, one thing that can be improved in post-processing and add a lot of value to your videos is color grading. This encompasses several color and picture functions that up until recently only pros could use. It requires quite some “playing around” to get the right “look” you are after for each scene, but after you understand the basics, you should be able to give a dramatic look to your movie and blow everyone away. The importance of color grading is explained in this article (complete with screenshot examples), written by the author of the best-seller “DV Rebel” book.

A few months ago at the popular video forum DVXUser there was this thread about color grading. Because the picture in question was tweaked by many users who had a go at it, we will also use the same one too for comparison reasons, although our tutorial will be Vegas-specific. I choose Vegas Movie Studio 8 Platinum because it’s the most powerful NLE in the consumer market, for the money ($130).

This is the original captured picture (click for a larger view):

This is the picture the original forum poster tweaked with Final Cut Pro:

And this is what I tweaked with Vegas:

I believe that my version is not only more dramatic, but also boosts the original colors as much as possible, instead of having everything looking greenish (except if that’s the look you are after, of course). The only thing I was not able to do with Vegas was to clip the highlights, so any suggestion is welcome (notice that in my version the boy’s face and t-shirt are shining a bit too much rather than looking matte). So, here is how I achieved that look:

1. Download the free Aav6cc filter and install it. Load Vegas and load in the timeline the original picture above.

2. Add the “Color Curves” filter on your clip. For both “RGB” and “Green” make it look like this:

3. Add the “Color corrector” filter and make it look like this:

4. Add the “Brightness and Contrast” filter and give contrast the value 0.15

5. Add the “Aav6cc” filter and give the following values to it:
Red: unchanged
Green: Hue: 50, Saturation: 80, Lightness: 0
Blue: Hue: 0, Saturation: -70, Lightness: 0
Cyan: Hue: 0, Saturation: -50, Lightness: 0
Magenta: unchanged
Yellow: Hue: 0, Saturation: 0, Lightness: -60 and check “Invert Influence”

Generally speaking, depending what the “main” color of your scene is (in this case we decided it’s green), you change that color’s curve equivalently, and you try to boost it using the “Aav6cc” filter while “killing down” the colors that don’t appear much in the scene (in this case the blue-ish colors). While each scene will require its own tweaking method, the “boost/kill” method is usually your best bet to get it right — at least for dramatic indoor shots.

Watching movies…

…has become impossible. Each time I see a shot, I don’t see the movie, but I see a sepia filter, or a color degradation, or film grain, or an extreme background blur. If you ever go photography, you can’t go back. You are forever ruined. ;-)