Posted on Thu 28 Feb 2008 at 2:10 PM PST. Filed under .
I have trouble watching non-English speaking movies. I can barely stand Greek in movies (even when I used to live in Greece). And yet, “Pan’s Labyrinth“, entirely in Spanish, came out so natural for me. The movie was so captivating that even if it was shot in Klingonese it would be enjoyable. One of the best movies I’ve seen in a long time. A fairy tale definitely NOT for kids. Watched it last night via Netflix’s online player.
Posted on Wed 27 Feb 2008 at 11:59 PM PST. Filed under .
NYTimes: “Lawyers for the Alaska Native coastal village of Kivalina, which is being forced to relocate because of flooding caused by the changing Arctic climate, filed suit in federal court here Tuesday arguing that 5 oil companies, 14 electric utilities and the country’s largest coal company were responsible for the village’s woes.”
Maybe this is what it will take to get countries to do something radical about it.
Posted on Mon 25 Feb 2008 at 7:28 PM PST. Filed under .
So there was this question on that video forum, right? About how to transcode an h.264/AAC MOV file into an h.264.AAC MP4 one without re-encoding so it plays back on the XboX360 and PS3 devices. Owners of such devices that use Vimeo to download videographer’s videos will probably have stumbled into the problem already.
So here are my tested solutions using popular software:
1. Quicktime Pro. Costs $20. You load the MOV file, you make sure that it’s indeed h.264/AAC using the “Show Movie Inspector” window. Then, you export, select “Movie to MPEG-4” and then click “Options”. There, you select the MP4 option, and you select both for video and audio the “passthrough” options from the format drop-down menu. That’s it, in 30 seconds you will be having a PS3/XBoX-compliant video file without re-encoding.
2. Download AvideMux2. It’s free. First, Avidemux2 will ask you if you want to use an alternative algorithm to load this kind of file. If you say “no”, you will get a crash after a while. If you say “yes”, you will get a known audio/video sync issue. So choose your poison. Then select “copy” for both video and audio, MP4 for exporting format and then you save your .mp4 file. The created file is compatible with the PS3 (dunno about XboX360), but Quicktime itself can’t play it back. It seems that Avidemux2 has an MP4 container bug.
3. Download FFmpeg. It’s free. You run the file like this: ffmpeg -i movie.mov -f mp4 -vcodec copy -acodec copy output.mp4
It creates a compatible MP4 file but B-Frames are all fucked up and so the file stutters on playback.
4. Download Mencoder. It’s free. You run the file like this: mencoder movie.mov -oac copy -ovc copy -o output.mp4
It says that it’s broken and that it can’t copy AAC audio and that you will need to override this by using the -fafmttag 0x706D option. You add that and you get an MP4 file. Only that this file is broken and it doesn’t work.
So, commercial proprietary solution 1, open source 0. You get what you pay for, obviously. This doesn’t mean that Quicktime is perfect, I still hate its “tick” problem with h.264 MP4 videos and the fact that the MPEG-4 exporting has no de-interlacing option. So in general, you have to use a gazillion utilities that each one does one part of what you need in order to accomplish a seemingly simple task.
In all fairness, the “Transcode” OSS utility might be able to do what we need to do here, but it only runs under Linux, and this takes out 99% of the Vimeo users.
Posted on Mon 25 Feb 2008 at 4:56 PM PST. Filed under .
Wow, a very sexy Hugh Jackman, I don’t even want to think the countless painful hours spent on the gym building that body. Thankfully, the producers let him grow his chest hair back, as he is currently filming the “Wolverine” movie. This is why I like the Wolverine super hero: ’cause he’s a hairy badass. He doesn’t look like a wuss. I don’t like the real-life actors btw (I can’t stand their insecurities — I have enough of my own), I often like the fictitious characters they portray though. Jackman’s wife seems to like Wolverine too, as it is said that sometimes Jackman wears the X-Men costume in their bedroom…
I guess I can ask my (also hairy) JBQ to come to bed with his work costume, covered in printed sheets of C/C++ and Java Android code. 😉
Posted on Mon 25 Feb 2008 at 1:49 PM PST. Filed under .
And so the popular with teenagers Stage6 is going to close. Reason being that it’s “too expensive to run”. Now, leaving aside conspiracy theories that RIAA/MPAA might be lingering to sue them as Stage6 is a pirate’s heaven, truth is, this site IS expensive to run.
The reason why it is expensive to run is because they are not clever about it. Here you have people uploading GBs of video, and Stage6 shows them as is, without a sensible re-encoding. This obviously does not fly well with bandwidth consumption, which is the No1 wallet killer. If they had the brains to do HD the same way Vimeo does it (re-encode the HD stream in a lower bitrate HD in the page, allow an SD version to be embedded only, and allow for download of the original stream), plus re-encode files only if necessary (a formula could be used to decide to either re-encode or not based on the video time vs bitrate and filesize), that would have probably save them millions of dollars in bandwidth by now.
But, they didn’t seem to have the brains, so they are out of the picture, leaving Vimeo being pretty much the only big-enough video sharing site to support HD.
Posted on Sat 23 Feb 2008 at 7:49 PM PST. Filed under .
My JBQ just ordered the 50″ Pioneer Kuro PDP-5010FD! At last, a real 1080p HDTV (our current 55″ Sharp only does 1080i/540p, not even 720p). I just hope it arrives in one piece, as it’s an almost $4000 purchase.
We spent the day yesterday trying to find cheaper alternatives to the Kuro. We saw the Sony LCD alternatives which we didn’t like the over-sharpen saturated images, we tried the new Sharp LCDs that have uniformity backlight problems, we saw the new Panasonic TH-50PZ85U series (pre-order only at this point) and we were actually close to getting this TH-50PZ85U 50″ plasma TV as it has a 30000:1 contrast ratio. Only to find out that Panasonic changed their press release and site to change the 2:2 24p pulldown to 2:3 pulldown (which means no real 24p support), plus it has no pixel-to-pixel mode (useful if you are using the panel as a PC monitor, or playing games), plus a few other small issues. Besides, even if it had the 24p support, 2:2 pulldown means that the panel would run at 48Hz instead of 60Hz or 72Hz (as the Kuro can do), and 48Hz means flickering. We could buy that Panasonic for less than $2000, and still, we decided to pay the full price and get the best there is for the money: the Kuro.
In fact, yesterday JBQ asked a very interesting question that was important to our decision to go with the Kurro: “don’t tell me what it does well, tell me what it does wrong“. And we couldn’t find a SINGLE thing missing from that TV, feature-wise.
And don’t give me that crap that “plasmas die easily”, that’s a myth. Modern plasmas don’t have such issues anymore. And their natural image is just amazing, and worth the risk. Your eyes will thank you.
If you don’t have the money for a Kuro but you still want the best there is, I highly recommend that Panasonic btw. It’s the second best on the market in my opinion (for the price that is).
Posted on Sat 23 Feb 2008 at 2:35 AM PST. Filed under .
Here is how to burn your own HD video in a Blu-Ray format on normal DVD discs, completely free. This method worked with my Sony PS3, it is known to work with most Blu-Ray players but not all of them. Of course, this won’t work with plain DVD players or HD-DVD players (read here how to create HD-DVD discs on plain DVDs). The funny thing is that 80% of both these methods are identical for both HD architectures: from the moment you have completed step #7 (which takes care of the mutual mpeg2 encoding), creating a Blu-Ray and an HD-DVD disc should take 10 minutes for each from that point on, it’s that fast! Basically, this method allows you to use a common DVD burner and common DVD disks to burn HD video. But you will still need a Blu-Ray *player* to play that video back.
This method is credited to “Racer-x“, but I have modified his version in order to adapt it in terms of video editing. This version also features a custom mpeg2 bitrate option which allows you to fit more footage on a single disk. More significantly, I use all-freeware utilities, without the need to purchase Nero.
1. Install the stable 2.5.7 version of the AVISynth application. Follow the default options during installation. Once it’s installed, you can safely delete its downloaded installation file.
2. Download the plain version of Mplayer for Windows and unzip it somewhere that you can find back easily, e.g. c:\video\mplayer\
3. Download the Huffyuv lossless codec. Unzip the .zip file on your desktop, right click on the huffuyv.inf file and select “Install” (note: Vista might not give you that option, in which case manual registration of the codec’s DLL file must happen via the DOS prompt, google it). After about 15 seconds, you can delete these files from your desktop, as the Huffyuv lossless codec is now installed on your system. Open a DOS prompt and navigate to the mplayer folder (e.g. “cd c:\video\mplayer\”, without the quotes). There, run this command: vfw2menc -f huff -d huffyuv.dll -s settings.mcf and on the new dialog that pops up select: “Predict median (best)” from the first drop down menu, and “<-- Convert to YUY2" from the second drop down menu, while leaving unchecked the other options. Then click "ok" to discard the Huffyuv configuration dialog. This action only needs to be done once for your system and it helps us by forcing the Huffyuv codec to create smaller files. You can now delete the c:\video\mplayer\ folder and the Huffyuv files from your desktop.
4. Capture, set up the right Project Properties for your footage, and edit your HD or HDV footage as usual with Premiere or Vegas or other editor. Thorough exporting example under Vegas follows: To export, click "File" and "Render As". Select .avi for the "Save as type", and the "HDV 1080-60i intermediate" template (or 50i if you are on PAL). Then, hit "Custom". On the first tab select "Best" quality. On the video tab leave everything as is except the video format, select there "Huffyuv v2.1.1". Then, hit "Configure" and a new dialog pops up. There, make sure that "Predict median (best)" from the first drop down menu, and "<-- Convert to YUY2" from the second drop down menu are selected (leave unchecked the rest of the options there). Then click "ok" to take that new dialog away. On the Video tab make sure you export as progressive, with the right frame rate as the original footage and 1440x1080 and aspect ratio 1.3333 (if this was HDV footage, that is). Leave unchanged the "Audio" tab, and then hit "ok" in the "custom template" dialog. Then, you must give a name to your .avi file (e.g. "huff.avi") and hit "save" to a predefined folder (e.g. C:\video\huff.avi). The encoding procedure will start. Regarding Premiere/AE, I heard nightmare stories about not being able to export correctly in Huffyuv, so you might want to try a frameserver technique instead.
5. On Vegas, export again, but this time the audio alone: click “File” and “Render As” and from there select the “AC3” filetype. Name the audio file “audio.ac3” (or something like that) and export it on the C:\video\ folder again. If you can’t see an AC3 option on Vegas it’s either because you are using a pirated version of it, or because you forgot to install DVD Architect, the companion Vegas application. If you are not using Vegas, or if your video editor does not support exporting in AC3, you can use a freeware called BeLight to do the job. Try exporting the AC3 audio with a bitrate of 128 kbps, or 160 kbps and 192 kbps depending how much space you want to waste on audio versus quality.
6. Open notepad.exe or other text editor and add this line in it: DirectShowSource("C:\video\huff.avi")
Save the text file as “avisynth.avs” on the same folder: c:\video\
If you get error messages, or you are using a frameserver, use this two-line code instead: AviSource("C:\video\huff.avi", false)
ConvertToYV12()
Alternatively, you can also try this (in other words, use whatever works for you): AviSource("C:\video\huff.avi", false).ColorYUV(levels="PC->TV")
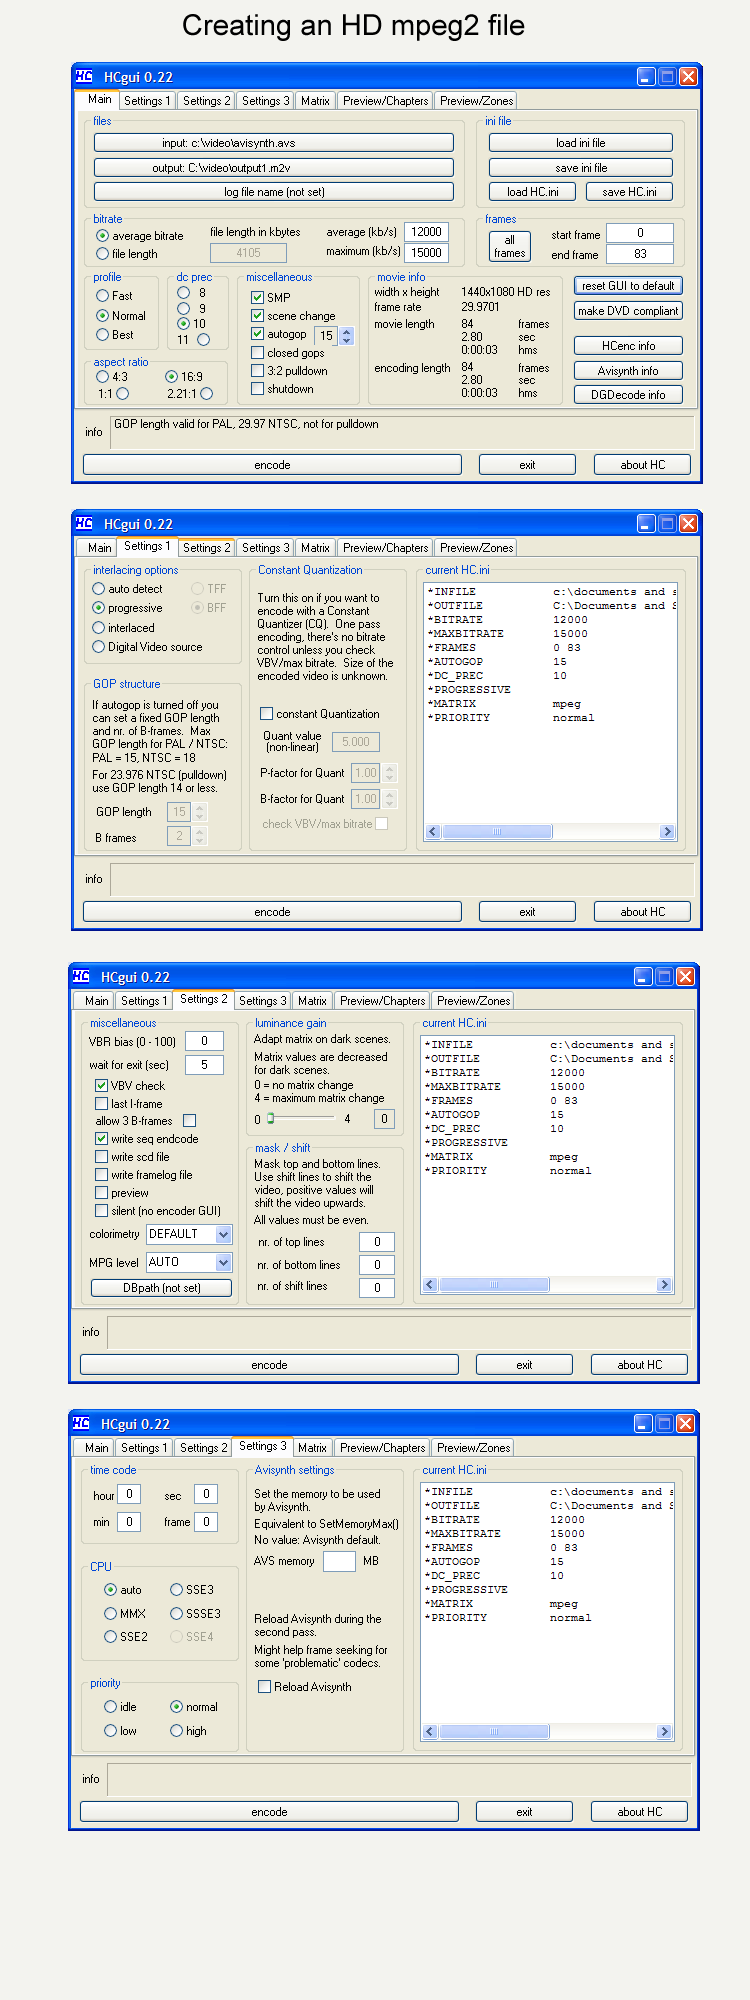
7. Download and install the HCEnc utility. Load the HCEgui.exe and make it look like this. Leave the rest of the tabs of this app as is. If you are using a 24p Huffyuv AVI file instead of PAL 25p or NTSC 30p, use an “autogop” of 12 instead of the suggested 15 and also check the “3:2 pulldown” option too. When everything looks like the above screenshots, select “encode” and wait for the encoding to complete (it will take a while). Just a note, you might want to use more bitrate for the video than the 12000/15000 kbps suggested, maybe at around 15000 kbps average, 18000 kbps maximum. Don’t use more than that though, as the video will stutter during playback. Besides, the less bitrate you use, the more HD footage you can fit on a plain single-layer DVD disc, so find a golden balance between bitrate/quality and video duration.
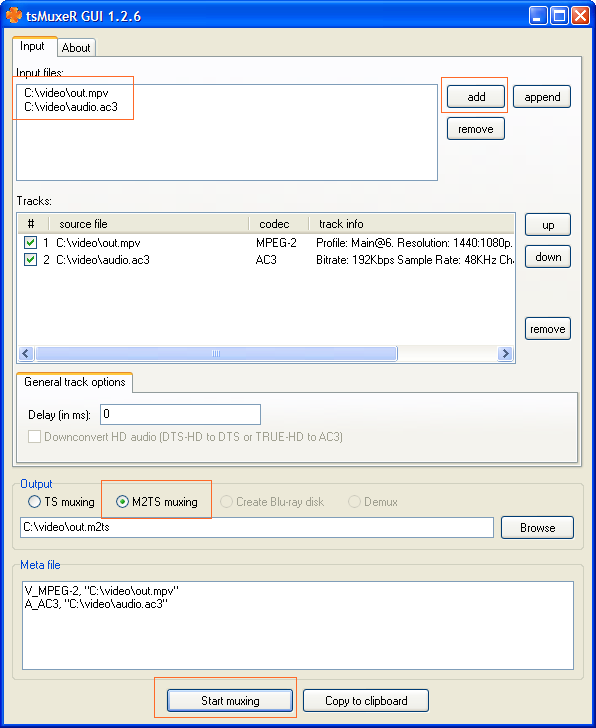
8. Rename the “c:\video\output1.m2v” file to “c:\video\out.mpv”. Download, install and load tsMuxer, and “start muxing” with these settings.
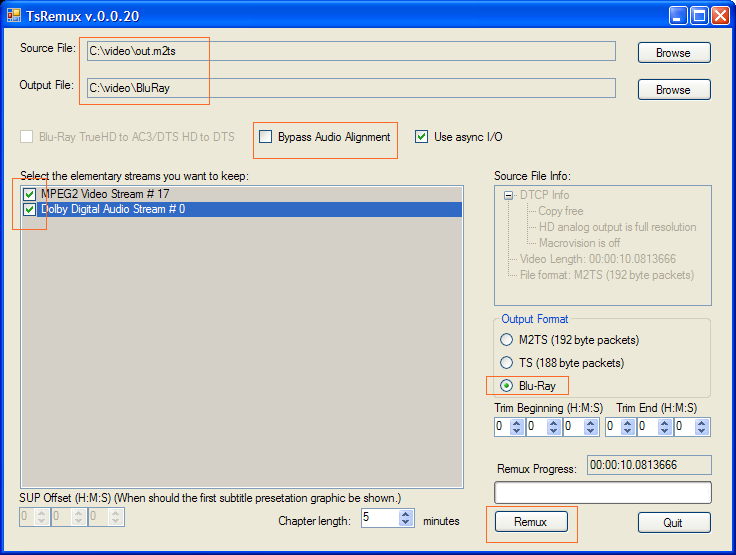
9. Download, install and load tsRemux, and “remuxe” with these settings.
10. Download, install and load ImgBurn 2.4.x (new version required). Select “Create image file from files/folders” and then hit the “browse for a folder” icon and give it your “C:\video\BluRay\” folder. On the “Destination” option select “c:\video\bluray.iso” as filename. Click “Options” and select “UDF” for file system & UDF Revision “2.50”, while leaving the rest unchanged. Then click the big button “Build” and wait a bit. Then from the “Mode” menu select “Write”, and in the “Source” select the “c:\video\bluray.mds” file. Then put an empty DVD-R or DVD-RW disc on your burner (warning: avoid dual-layer discs, not very compatible). When you do this, the big button will be enabled, and then you can start burning the disc! Enjoy!
If you would like to test this method but you have no HD footage of your own yet, feel free to download my favorite HD clips found on Vimeo.com (if you have a Vimeo account and you visit their respective pages, you can download the original uploaded HD video file):
Posted on Thu 21 Feb 2008 at 4:32 PM PST. Filed under .
James Morrison used to be pretty hot 10-15 years ago. I am watching “Space: Above and Beyond” through Netflix these days and he plays the “InVitro” Lt. Col. McQueen. In the series, InVitros are not exactly human. And I have a soft spot for non-humans. 😉


