I wrote in a hurry two months ago about how I shot my first music video, but having already shot my second one, I have done some adjustments into my workflow, which I will share with you below. As I have explained in the past, nearly all the professional music videos are slowed-down, even when they don’t look like they are. And of course you don’t need lots of money to shoot a music video, you can do it on a budget.
1. Acquire the audio CD of the song you want to shoot a video for. Compressed audio formats like MP3, OGG, and AAC won’t work correctly, you will end up with an A/V sync issue eventually, so get the original audio CD. Load the CD into iTunes. Go to “Edit”, “Preferences”, and change the importing format to WAVE like this:
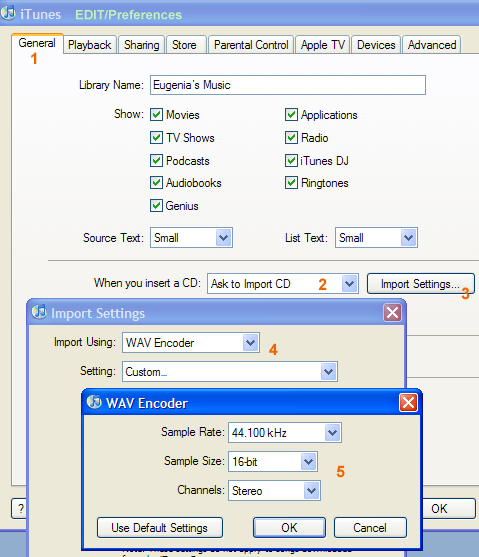
Then, rip the CD with these settings via iTunes. The ripping will create a .wav file on your iTunes library folder, usually somewhere around here: C:\Documents and Settings\USERNAME\My Documents\My Music\iTunes\iTunes Music\ for Windows, or somewhere on your ~/Music/ folder if you are on a Mac.
2. Install Audacity 1.3x from here. Load Audacity, and then open into that audio editor the .wav file that was ripped earlier via iTunes. Click “Effects” and select “Change speed”. Make the audio’s speed 25% faster like this:

[Update: Changing the tempo instead of the speed also works, and it’s preferable, because the pitch is preserved. Just tweak the “tempo” plugin by 25%.]
Then, save the audio back as wave (.wav) with a different file name via Audacity.
3. Go back to iTunes. Load the sped up version of the song created by Audacity above to iTunes by adding it to the iTunes music library. Place an empty writable CD-R on your optical drive. Place the sped up song on the “Burn” playlist of iTunes. Burn the song as an audio CD twice. Keep one copy, and give one copy to the band to rehearse the speed up version a few days before the actual shooting.
4. When the shooting day arrives, use a portable audio CD player to get the singer to lipsync, or if you are shooting in the band’s rehearsal space, use their audio CD player which is possibly hooked into big speakers. Shoot your video with that sped up audio. If you are using a Canon camera, use “Cinemode” and “neutral color” to make the video look as desaturated as possible (the duller it looks, the better it color grades in post processing). Do a lot of takes. Shoot in 1080/50i if you use a PAL camera, or in 1080/60i or PF30 if you use an NTSC camera. I suggest that you don’t shoot in 24p, because by the moment you slow-down the video on step #6, you will need all the frames you can get to make it look smooth. Don’t worry, it won’t look like home video because of the slow-down involved. 1080/60i or PF30 are the best ways to shoot (compared to PAL modes or 24p) because the kind of slow down we do here is perfect mathematically: 60i/2=30/25%=24p. What this formula means is this: “After you de-interlace a 60i stream, you get 30p. Because we make that 30p stream 25% slower on step #6, we get a true 24p frame rate across time”. And that’s the frame rate we export at the end of step #8. If you are concerned about 60i having too high of a shutter speed, consider using PF30 (found on all new Canon HD cameras), which is as good as 60i in terms of the “mathematics” involved, but it uses lower shutter speeds. I would be using PF30 for my music video projects if my HV20 supported that. In fact, I hereby declare the Canon HV30 the best consumer HD camera right now to shoot music videos, because of its PF30 shooting mode and overall quality.
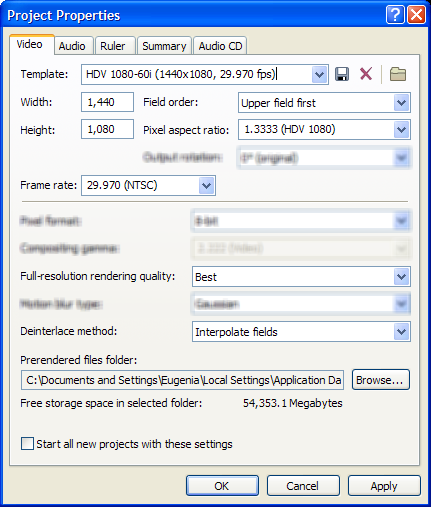
5. When the shooting is all done and you are ready to start editing, load the footage on your video editor. I will use Sony Vegas for my tutorial here, but Premiere and FCE/FCP are equally capable. Copy away to the video’s project folder, and place in the audio track, the originally ripped .wav file (not the sped up one, but the normal one you ripped on step #1). On Vegas, it’s very important to have the right project settings before you start editing. Click “File”, then “Project Properties”, and a new dialog will pop up. In there, click the right outmost icon called “Match Media”, the one that looks like a yellow folder. From there, select one of the files you will be editing with, and click “open”. Make sure “none/progressive” is always selected in the “field order” option, and for quality select “Best”. If you shot interlaced (e.g. in 50i or 60i), make sure that for the “de-interlacing method” you select “interpolate”. For NTSC 60i HDV for example, it would look like this (you can safely ignore additional settings not shown in my screenshot but found on Vegas Pro instead of Platinum).
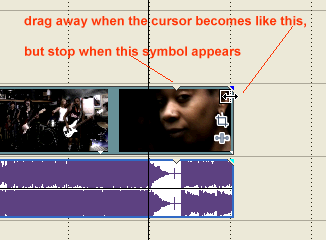
6. Then, place a take of your footage (hint: dragging a clip from the project media tab to the timeline with the right mouse click rather than the left, allows you to place in the track the video across the timeline without its accompanied audio). Right click on the clip event in the timeline, click “properties”, check “disable resample”, and change the “playback rate” to 0.800. This change has effectively made the video slower now, which will sync perfectly to the non-sped up song. Now, left-click on the right side of the video take and drag it to the right to make the video longer. Stop when a little arrow appears, as in the picture below. We need to do that extra step because when we changed the playback speed to the slower 0.800x, Vegas doesn’t automatically resize the video in the timeline to fit the whole take.
7. Add more of your takes on different video tracks and adjust them as in step #6. Then, try to sync up the audio and video on each of these takes. It will take some practice, but it’s possible. On Vegas, if you select a clip in the timeline and then you keep the ALT key pressed while also pressing the numbers 1 or 3 in the enabled numerical keypad, it will move that clip frame by frame left or right in the timeline, so that can help you be more accurate with the audio syncing. You can even “lock” a clip in the timeline so you don’t move it accidentally while editing. Then, edit away. Be aggressive with cutting scenes, as rock videos require quick change of shots. Slow-down even more some shots that don’t require syncing. Color grade aggressively too at the very end.
8. Export in 24p (that is, 23.976 frame rate), progressive field order. I suggest h.264 at 12 mbps for video codec, and AAC 160 kbps for audio, with the MP4 container at 1280×720 resolution for HD, or at 874×480 if you shot in widescreen miniDV SD. This exporting also makes the video compatible with AppleTV, Vimeo, XBoX360 and PS3, so it would be easier to enjoy it in on an HDTV.
[9. OPTIONAL, for PAL users only]. If you need to export in 25p for PAL countries instead, you export your 24p video in step 8 using an intermediate lossless codec (e.g. Lagarith, Huffyuv, Cineform, DNxHD etc), and then you re-time it to 25p this way. Yes, this means that even if you live in a PAL country, you need an NTSC camera to follow this way of shooting music videos.
Now, go help your favorite local rock band!


