This is a small tutorial for users who have never used Vegas before and would like to create a video project quickly without putting too much information on their heads…
Installation and Capture
So, install the version of Sony Vegas you need. Movie Studio will deal with DV content, Movie Studio Platinum with HDV/AVCHD content, and Vegas Pro is the professional HD version. Make sure you got at least 768 MBs of RAM for DV and 1+ GB for HDV/HD available.
Open the application. Place your camcorder in “Play” mode (rather than the “recording” mode) and connect it via USB (for AVCHD), or the Firewire (also called iLink and IEEE1394) cable to the appropriate port on your PC. If you don’t have such a port on your PC, then you can’t continue uploading your DV content to the PC. All Macs come with one, but most PCs don’t. If you don’t want to work with a camera but pre-existing videos/pictures on your drive, load them by clicking the “Import Media” button in the “Project Media” window tab.
To capture content from a camera instead, click “File”, and then “Capture Video”. In the new dialog popping up, select either “DV” or “HDV” depending on what kind of camera you got. Pressing the << button on the new tab that will open in the application, it will run the tape backwards. Then press the "Play" button and then press the red "record" button. When it has recorded the bits you wanted, press "stop" to stop recording. After about 5 seconds your recorded clips will be transfered to the neighboring window tab, the one marked as "Project Media".
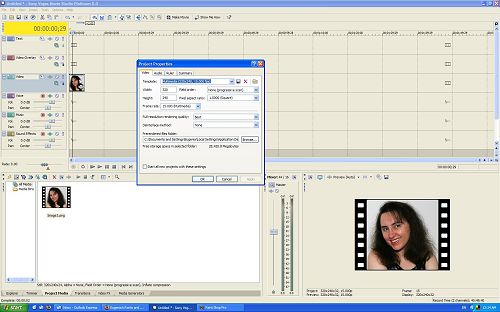
Click the menu "File" and then "Project Properties". Using the template list select the one that's representative for your footage. For example, if the camera you captured footage from is NTSC HDV, you select the 1080/60i template. If you are not sure, then use the yellow icon with a tooltip that says "match media" in that same dialog. After you click "Match Media", select a file representative of your footage, and Vegas will do the rest auto-completing that Project Properties dialog. The only changes you will need to make is changing quality to "Best" and de-interlacing to "Interpolate".
The Timeline
Now, from the clips available in the “Project Media” tab, select the scene/clip you want and drag and drop it in the timeline above it by aligning the clip with the track called “Video”. Save your project from “File” and “Save As” (in fact, save often). After that, you can click to the clip you placed in the timeline, and you can preview it by clicking the “play” button below the timeline. Vegas is pretty slow playing back video from the timeline in real time, so don’t worry, there is nothing wrong with your PC.
You can also drag-n-drop more clips next to each other, you can drag them left and right to align them the way you want to, and you can even put a small part of a clip on top of another which will automatically create a nice looking transition! Make sure there is no space between clips though (you will get a teal colored line when you place a clip perfectly next to another clip). You can also add external videos and clips (and even pictures too, although make sure pictures have smaller size than 1920×1080), by loading them into your project by clicking the “Import Media…” button in the “Project Media” tab (second from the left) and then dragging them to the timeline too.
Editing
Now, if you want to edit one of your clips in the timeline, select it by clicking once with the mouse, and then press “S”. This will “split” the clip at that point that the mouse pointer was. You can choose to keep both pieces and move them around, or select one and press the “DEL” key on your keyboard to remove it from the timeline. To make some slow or fast motion, just place your mouse cursor at the edge of a clip in the timeline (the cursor becomes a rectangle with a two-way arrows) and by pressing and holding the CNTRL key, drag the clip left or right.
If you don’t want voice to be heard on a particular clip, select that audio by clicking on it once, press “U”, and then press the “DEL” key. This will keep the video and will remove the audio part. Don’t worry, the original clip files on the “Project Media” placeholder are not modified when you do such changes, only the copies in the timeline are. You can also drag ‘n’ drop an mp3 audio file to the track called “Music” and align it where you want horizontally (and split it off too by clicking “S” after selecting it, if you don’t want the full song but just a part of it).
Effects
To add some text press the “Media Generators” tab (next to the “Project Media”), click “Text” from the list, and then select the kind of text effect you like. Drag n drop it to the timeline, also in the “video” track. You can make it last less time by resizing the text clip (simply drag it to the left from its far-right side). You can modify the actual text in it using the pop up window that will come up, or by right clicking to it and selecting “Edit Generated Media”.
To add some special or coloring effects, click the “Video FX” tab, select one from the list, and then drag n drop it to the clip you want in the timeline. To edit later that effect, press the little “+” icon on the right of each clip and its properties will pop up again. Same drag ‘n’ dropping goes for the transition effects too (found in the “Transition” tab), which can only be placed between two clips in the timeline (make sure there is no space between these clips in the timeline). To remove a transition it can only be done by putting the cursor on it and pressing CNTRL and / (in the numeric keypad).
Export
After you have an arrangement you like in the timeline, it’s time to export. Click “File”, and “Render As”. From the “Save As Type” select “MainConcept MPEG-2” for video and “AC3” for audio if you are exporting for DVD (again select the type of DV camera you got in the templates available for this filetype), or “Sony AVC/AAC” with the “PSP full screen” template for YouTube export or the iPod/PSP, or use the “Windows Media Video” with an appropriate template for computer viewing or Xbox360 purposes. For WMV, choose “3 Mbps video” template for DV cameras, or the right kind of HDV template for HDV cameras. If you get “jaggies” on the PSP and WMV videos produced, then modify the “project properties” dialog under “File”, to have a “field order” of “None (Progressive Scan)” (more info on de-interlacing here). The mpeg2 export will have jaggies regardless, that’s normal.
Now be patient for the encoding to take place, and be merry with the result! Using Vegas is easy! If you need more help, click on the “Help” menu and select the “Show me how” option. This has interactive tutorials, really easy to follow!
Update: Some Vegas tips and tricks here. Exporting in HD 720p with Vegas here.


