Author Archive

Exporting with Windows Movie Maker HD in 720p

To export your HD/HDV footage from Windows Movie Maker in 720p you need to own the Vista Premium/Ultimate versions. All the other Windows versions only support plain DV, not HD. So, first you need to install the Windows Media Encoder 9, create a profile and save it on Movie Maker’s profiles folder, then edit as usual, and then export using that profile. Visual guide here. The file is compatible with Vimeo HD and XboX360. Microsoft might already have some 720p HD profiles btw (I can’t test this as I only own the “Basic” version of Vista), so have a look around for that first on Movie Maker’s exporting dialogs before going ahead with this tutorial.

Exporting with Magix Movie Edit Pro in 720p

To export in 720p with Magix Movie Edit Pro 12, load your footage on to the editor, set the project settings to HD/HDV with the appropriate frame rate, edit, and then export like this. The only change you might need to do is to select either PAL’s 25 fps instead of the suggested NTSC’s 29.97 frame rate, or 23.976 if you shot in 24p mode (when pulldown is removed). If you shot in default mode with an NTSC camera, leave the frame rate unchanged. The file is compatible with Vimeo HD, Sony PS3 and XboX360.

Exporting with Quicktime in 720p

This is a guide on how to export using Quicktime Pro (PC or Mac), iMovie, Final Cut Express or Final Cut Studio using the Quicktime Component. First, make sure your project’s properties is correctly set to HDV or HD with the right frame rate and aspect ratio, and then edit as usual. At the end, select “export” (it’s probably called either “export” or “advanced” on the new iMovie ’08) and select one of the two methods.

1. This Quicktime export creates .mov h.264 files. This method has good options, but it crashes frequently when you click “Settings” to configure your video (for me, this crash is reproducible on both my Mac and my PC). However, you might get lucky. Uncheck de-interlacing if your footage is not interlaced.

2. This MPEG-4 export creates .mp4 h.264 files and it’s easier to use, but it does not have a de-interlacing option (which might leave “jaggies” on your video), and it occassionally creates a “tick” on the picture (a keyframing bug that Apple hasn’t bothered to fix for over a year now).

Between the two options, I would go with the first one if it doesn’t crash for you. The only change you might need to do is to select either PAL’s 25 fps instead of the suggested NTSC’s 29.97, or 23.976 if you shot in 24p mode (note: iMovie and Final Cut Express don’t support native 24p editing). That’s it, now sit back while your video is encoding and after a while you will be having a progressive 720p file for usage with Vimeo/Youtube HD, or AppleTV (.mov/.mp4), and the XboX360 or the PS3 (.mp4 only).

Warning: Apple’s Quicktime has a stupid bug for over a year now, where de-interlacing just doesn’t work, even if you tell it to. In that case, or if you are using iMovie ’09, check this guide.

Exporting with Adobe Premiere in 720p

A few weeks ago I wrote a guide on how to export in 720p from Sony Vegas, so here’s a guide for Premiere. The exporting is similar for Premiere and After Effects. First, make sure your project’s properties is correctly set to HDV or HD with the right frame rate and aspect ratio, and then edit as usual. It’s your responsibility to know what kind of attributes your camera uses in its recorded format (although you can easily check this out after importing a file from your camera to Premiere and checking its properties).

CS2/3

After you edited your footage, click “Export”, “Adobe Media Encoder”. If you are using a non-Elements application (e.g. Pro, After Effects) use this guide, a method donated by Vimeo user Myksto. Modify the exporting option for the frame rate to reflect your source footage (e.g. if you are on 25fps PAL on 29.97fps NTSC or 23.976 for 24p).

If you are using CS2 and native 24p HDV, you need to install this preset to choose in your sequence properties (CS3/4 already supports it). If your footage is PF24 instead (24p wrapped in 60i, like in most consumer Canon HD cameras), then you need to remove pulldown before editing and exporting in 24p (this is needed for all CS versions).

CS4/CS5

The exporting method for Premiere/AfterEffects CS4 is pretty much the same as above, but here it is again with a bit more explanation, and in English this time. Check it out here. If you want a bit more quality, change the suggested bitrate from 5 mbps to 10 mbps, and max bitrate from 8 mbps to 20 mbps.

Elements

If you are using Elements 4, click on “Share” and select the “Personal Computer” option on Elements and then “Quicktime”, then click “Advanced” and customize the exporting dialogs like this for .mov h.264 on Elements (recommended method), or like this for WMV (unfortunately, the WMV exporting dialog on Elements does not have an option for progressive/de-interlacing though). The only change you might need to do is to select PAL’s 25 fps instead of the suggested NTSC’s 29.97 if your camera is PAL. If you shot in default mode with an NTSC camera, leave the frame rate unchanged. Elements doesn’t support 24p editing, so exporting in 24p would be a mistake (although there is a 24p hack that works with Elements too).

Conclusion

That’s it, now sit back while your video is encoding and after a while you will be having a progressive 720p file for usage with Vimeo, YouTube, PS3, XboX360 (up to 30p exports), and the AppleTV (up to 25p only). If you used Elements, the XBoX360/PS3 won’t playback the h.264 file (MOV container incompatibility), but only the WMV one. If you used CS2/3/4, they will play both the MP4 h.264 and the WMV because the professional versions of Adobe allow you to choose a different MP4 mode that works with the PS3.

Gnome’s Online Desktop

A few years back there was this rumor about Google creating an “always online OS” based on Ubuntu, but this is something that it hasn’t been materialized to date. Instead, Red Hat jumped on the opportunity and they are now touting their “Online Desktop” for Gnome, which is basically that same idea.

I am a major fan of Havoc Pennington, but sometimes I don’t know what he’s thinking. After the utter failure of Mugshot in terms of user base (not in terms of engineering), he probably thinks that this time he’s got the right idea. Well, he does have the right idea, it’s just that I don’t believe that it will pan out. Like with Mugshot, the idea was interesting, until Facebook came out with a solid application API and made Mugshot irrelevant. Every action you can do with Mugshot it can be done with the Facebook API. Thinking about it, it would make more sense to write a Facebook application around the mugshot server rather than have a standalone client that no one uses.

Anyways, the reason why I am saying this will fail is because again, they forget the big picture. They optimize and write this for the Gnome desktop, not also for Windows and OSX. So basically the biggest feature of the Online Desktop, which is “login on any computer to access your data”, requires Linux and Gnome. And their idea that the Average Joe will travel the world with a LiveCD in his pocket is ridiculous. This is simply a non-open minded way of seeing both the future and the market they are in. And even if the idea becomes popular with the Linux users, it won’t bring hordes of new users to the OS. It will simply be a repeat of the MIT student of 1988 saying “I have Unix at school, and I have Unix at home, and guess what, I can see my school desktop at home using something called X11”. In absolute terms, this was then, and this is now, and it’s the same all over again.

But think about it, who the fuck cares if this guy used X11 to view his desktop at school? Given the fact that Windows did not have this feature and yet it got 94% of market share in the subsequent years, it only proves that this was either not a killer feature, or not managed properly. And as long the Online Desktop is tailored made for Gnome, it will remain “just a new Gnome feature” and not a revolution. Not having the source code of Windows or OSX might be a problem to create a fully integrated solution, but there might be ways to create something elegant and yet less integrated.

Now you ask, why does the Online Desktop have to be a revolution and not “just another feature”? Because this IS where computing is going and it would be beneficial for open source to get there first, and because that’s Havoc we are talking about. He aspires to do big things and people listen to him. If Havoc and his 10-member team can’t bring revolution using Red Hat’s millions of dollars, no one in the Open Source world can.

Except if Google steps in.

MALEVOLENCE

A great short horror film, shot in 3 days time. HD version here. Might give you nightmares so brace yourself.

CreativEase Color and Blur Effects Pack

Pixelan Software sent me over their CreativEase Color and Blur effects packs for a review and I had a look at it today. I am impressed by the abilities of these four plugin filters and the value they can bring to extreme color grading.

The Posterwise plugin I explored the other day on my previous blog post about the “A scanner Darkly” look but there’s more into it. Changing the posterization model from the default HSV to RGB or YUV creates new looks.

The BlurPro supports three types of blur methods with Gaussian being my favorite. Together with the “Preserved Edges” style and spice effects can amount for many different looks. Pixelan already includes a number of presets for each plugin so it can make it easy to pick preset styles.

The OrganicBlur is possibly my least favorite of the pack, but it also has its uses. You can control the amount of blur, the spread and angle and rampling. Each Pixelan plugin includes a “map” of the picture where you target the place where you want the filter to take most effect. This way, you can create for example an otherworldly environment, but the body or head of a single person look more natural that its surroundings.

The ChromaWarp2 filter is the most fun of all. You can interchange channels, change individually the RGB values, blur and blend the picture or do a channel shift. With this filter you can range from a colorful unatural colors down to sepia. We should not forget that every Pixelan filter also comes with keyframing so if you can actually animate these colors per frame.

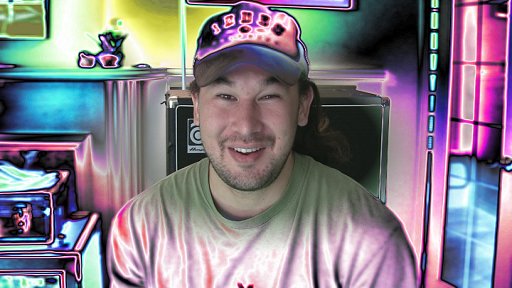
I got the best results when I combined the BlurPro with “Preserved Edges” at 65 & Gaussian Blur, with PosterWise “border only” on “relief” and with Magic Bullet “No 85”. It created a much better comic book look than with Posterwise alone.
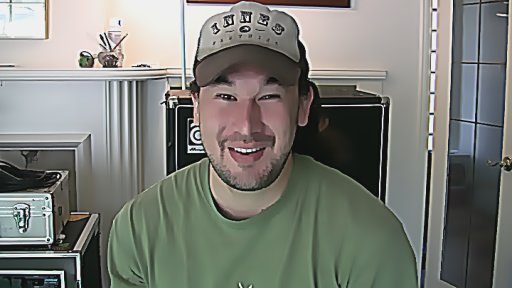
Before:

After:

Unfortunately, I have a major usability gripe with the Pixelan filters. If you make your changes, do something else, and then come back to it and by mistake you don’t save, the plugin resets all changes to defaults. This is not the correct usability. The plugin should just reset to the changes you had before you re-loaded it, not to the absolute factory defaults. I lost quite some work because of this unorthodox UI. [Update: Pixelan fixed the problem in a new release]

Another gripe, which is actually a bug, is that if you do a “copy” of a scene and then “paste attributes” on another scene (Vegas has this ability), the PosterWise plugin does not have effect on the new scene with the same settings that it was copied over. You have to remove the plugin from the new scene, reload it, and redo all settings by hand. [Update: Under more inspection, this is not a bug, it just takes longer to render long scenes as PosterWise renders serialized and does not give priority to the current frame you are in].

Other than these two gripes, the Pixelan CreativEase Color and Blur effects packs are good quality, with little to no noise, and affordable. If you are after specific looks on your works, you should consider them.

Credits: My two models are the Tyson and Sauncho Yen brothers, members of the Drist rock band.

Ether Hour

Special thanks to Jeff who gave me permission to use Ether Hour‘s music on my videos. Great indie music!

JBQ and I

I am the chick on the right.

Hardware DRM

According to this, new WD network hard drives restrict access to some media files if you are not the owner of these files. This is pretty unacceptable IMO. Why? Because here you have a hard drive that won’t serve you its files, even if you placed them on a public folder, while this is its basic operation. So why is it ok to allow serving of the PiratedApp.exe file and not of Transformers-bootleg.avi? It’s not. And what if you forgot your password and had to reinstall Windows? You are also locked up from your own files? This “feature” only serves the MPAA/RIAA, not the consumer, and yet the consumer is the one who buys these products. It is not the place of the hard drive manufacturer to play Cowboys and Indians.

Over at hv20.com the community put up a public FTP server where users can upload their HV20 footage in various media formats to show the others. So what if that server buys that WD model? The files won’t serve up anymore unless you fool the drive that the owner is the “Apache user”? What kind of bullshit is that?

If you can’t trust your hardware anymore to do what they were originally designed to do, then there’s no point upgrading that PIII at 1 Ghz Compaq laptop your mother in law bought for you 4 years ago.