Posted on Wed 2 Apr 2008 at 8:41 PM PST. Filed under .
I totally recognize myself in Homer Simpson (although my IQ is admittedly over 100). I like to eat a lot, including donuts, I am abrupt and have weird humor, I am lazy, I don’t have much hair left, and of course, I have this weird fascination about pigs: spider pig, spider pig… I totally get that.
JBQ is a Marge. Always the logical, down to earth person, who likes things being in order. He even has the long hair to prove all that. And he loves me so, even if I am a pig.
Posted on Wed 2 Apr 2008 at 1:58 AM PST. Filed under .
Mark Wisniowski posted an amazingly beautiful travel video. HD version and download here. It’s been a while (at least a month) since I saw a really worthwhile video at Vimeo.
Posted on Tue 1 Apr 2008 at 5:48 PM PST. Filed under .
I have decided to turn comments off on my blog from now on, for both mine and your sanity.
Truth is, I am a very passionate person, and so I can come out as a jerk too easily, even if my intention is not always so. Another reason is, this blog has become a bit too popular for my taste lately (averages 2000+ pageviews daily), and so when many random people come over here, the chances of trolling increase (same thing happened with OSNews).
I might turn on comments back one day, but it won’t be soon. If you want to comment, or clarify something, or ask a question, just email me on my hotmail account or use IM.
Posted on Tue 1 Apr 2008 at 4:34 PM PST. Filed under .
Some enthusiast videographers buy cameras in order to shoot music videos for local indie bands (and I am one of them). One thing to realize though is that professionally-looking music videos need a special kind of shooting. You can’t just set your HV20 to PF24 and expect the “music video” look.
Check this video here, recorded in 25p with a Canon HV30 at a live performance. And then check this video clip here, which is a proper music video, also recorded at 25p with a Canon HV20.
You will immediately notice how different the *motion* is between the two clips, even if they were recorded at similar shutter speeds and frame rate. The first video looks like “video”, and the second one looks like a proper video like the ones you watch on MTV or VH1. No, the “film look” has nothing to do with this, neither the shutter speed does.
Instead, there was a trick that was used during the recording to give it that look. They first burnt a CD with the song in question, but sped it up during its audio encoding to about 25%-33%. Then, they have the band perform the song at this sped-up rate (lip-syncing of course, as they hear it from the portable CD player that usually sits close to the drummer, who guides the rest of the band in terms of beat).
Then, on post production, you slow-down the band shots as much as needed in order for the lip-syncing to sync with the non-sped-up song version. This way, you get this kinda slow-motion look that you see on pretty much 95% of music video clips since the ’80s. Because this trick is used so much on music clips and because it’s only slightly unnatural, most people don’t realize that this is not the way it looks in real life or even how it was recorded. Here’s how you carry out this trick.
There are other ways to have the same effect, as long as your video editor supports it, but if its algorithm is even just a bit nuts, you won’t be able to get the same synced result, so the speed-up audio way remains the most fool-proof way. A discussion about this can be found here.
While this gives an otherworldly feeling to the viewer, it certainly changes fashion and likings. Most people now dislike normally-shot versions of songs. They just don’t feel right, even if THESE are the ones that are actually “right”. Sign ‘o’ the times.
Posted on Mon 31 Mar 2008 at 3:46 PM PST. Filed under .
I followed the tutorial here today and here you are, my first HDR picture below. It’s not a great pic, it’s just a test that I shot on my balcony today. After manipulating the image on Photomatix I loaded the picture on Paint Shop Pro for more specific manipulation (using just Photomatix is not enough to bring out the colors the way you want to).
Update: A better example that I just shot and processed.
Posted on Mon 31 Mar 2008 at 2:12 PM PST. Filed under .
A few years ago I became infatuated with writing cHTML mobile sites. I saw it as a challenge. Develop a website that can render on a 120×120 screen and be considerably usable. It’s not as easy as it sounds, as it has to render correctly to over 25 browsers and their (buggy) iterations, and have an actual design (rather than being a bunch of text on a white background like most mobile sites are).
But these days are gone. There is no point doing that anymore for the future browsers and handsets. Most phone manufacturers these days use either the Safari engine, or license Opera or they try to fake it by licensing Netfront and not give it enough RAM to play well with big sites (Sony Ericsson, this was for you). Most manufacturers now want next-gen browsers. Teleca went out of the mini-browser game last year, while today Openwave, the most popular mini-browser company on the planet, laid off 200 employees today, and they put a stop to further development of their browser (they’ll only do maintenance now, I guess). Thank God my JBQ left this company in time.
This is not to say that mini-browsers won’t be encountered anymore. Nokia still has their own S40 browser, Motorola has their terrible little P2k browser, while LG/Samsung fluctuates between Openwave and Netfront these days. Truth is, no one uses these mini-browsers. The halt of Openwave’s browser today is a testament to that, as Openwave once had 52% of the mobile browser market, and right now are below 20% just a few short years later. Besides, if someone was unlucky enough to get such a low-end handset for free from their carrier, they are much better off by installing the impressive Opera Mini instead.
This is not to say that we should not be writing mobile sites anymore. There are BILLIONS of people still who don’t own a smartphone but they still use one of these micro or mini browsers. Heck, even the mobile IE/Opera/Safari-based browsers DO need a simpler desktop-version site layout with not too much CSS and Javascript to render fast/well-enough. But the point is, the world is going towards a mobile system that can’t be characterized as “limited mobile” anymore, but a mini version of anything desktop. The keywords here are “full-featured browsers”.
A few years ago I said that 2010 will be the time that I will start using CSS and XHTML for my mobile sites instead of cHTML. My estimation seems to be good. Thing is, I don’t have the enthusiasm to do that anymore. I am seriously thinking of giving away my mobile autodetection script, the one that powers OSNews and Gnomefiles.
Posted on Sun 30 Mar 2008 at 7:59 PM PST. Filed under .
The idea is to get a still picture and animate it, make it look alive & interesting, through a 3D montage. This is a trick that’s used on many documentaries on History and Discovery TV channels when they show old pictures during narration. You probably have seen it if you like documentaries like I do. So, I took a picture and used Paint Shop Pro and Vegas to do the same effect, and you can see the result below. Here’s a cooler YouTube example.
I also created a .vf Vegas project for you to follow the tutorial. So download it to follow the guidelines (1.3 MB). Read the included Readme.txt for more info on how to make this Vegas project file work on your PC too. To create such an effect it requires some intermediate graphics application knowledge, not just video editing.
1. Select the picture you want to animate. Not all pictures are good for the job, as the picture needs to have some a composition that has things in front of other things, in addition to a pretty uniformed background. Like the picture I used below, which has the butterfly, the flower on the left, the flower at the center, and the green background, almost layered onto each other.
2. Make a copy of the picture you want to work with, and load that copy in the graphics application of your choice, be it Photoshop, Gimp or Paint Shop Pro. I personally used the latter. You have to “cut out” each element using the freehand tool in the “smart mode” (if your gfx app has that mode) with some feather and/or anti-aliasing. You must precisely select (it will take a lot of attention to make sure your selection is good) each element you want to animate in the picture (e.g. the butterfly, or the flowers), and you paste that selection as a new picture, with a transparent background.
3. Once you have cut-out all the elements , you use the equivalent of the “Clone Brush” on your gfx app to remove these elements from the original background image. For example, in my tutorial, check bg.png, and you will see that I have clone-painted above the flowers and the butterfly some green leaves. This way, the main background picture only shows the background element and not the rest of the objects that I cut out earlier.
4. If an element (now showing only in its own picture) was cut-off by another element in the picture (e.g. the left flower doesn’t show up completely in the original picture because the center flower is in front of it), you have to paint it out to make a complete picture. Same thing if a dog is in front of a human, you will have to fake (by painting it out) the parts of the human’s legs that the dog was covering in the original picture. You usually use clone-brush for this too rather than painting it pixel by pixel.
5. Then, change the canvas size for all the elements pictures (not the background picture) to the same size as the original picture. Remember, “canvas size” is not the same resize/rescale: it adds whitespace around your element to make the dimensions of the picture bigger, but it does not rescale the actual element. Then, you “resize/rescale” all the pictures (including the background image) to the right Vegas project size. For example, if you are going for an HD output, you might want to resize at 1440×1080 with aspect ratio 1.000. For the purposes of this tutorial I actually made the files 1024×768. Make sure though that no matter what you do to the element pictures, their backgrounds must remain transparent.
6. Bring all the pictures in to Vegas and set the project properties to “match” the picture sizes (as long as you only have pictures in that project, that is, otherwise always match your videos instead). Place the picture that serves as a background on the bottom video track, and each of its elements on the video tracks above it.
7. Then, you use the pan/crop tool for each picture to place it into its own place of the main screen and you use the keyframe timeline at the bottom of the pan/crop window to create a new keyframe at the end of the keyframe timeline. The first keyframe shows where the elements will show up on the first frame of the animation, and the last keyframe where they will “fly” towards at the last frame of the animation. You can also zoom in the background this way, so it gives the illusion of motion.
Posted on Sat 29 Mar 2008 at 4:30 PM PST. Filed under .
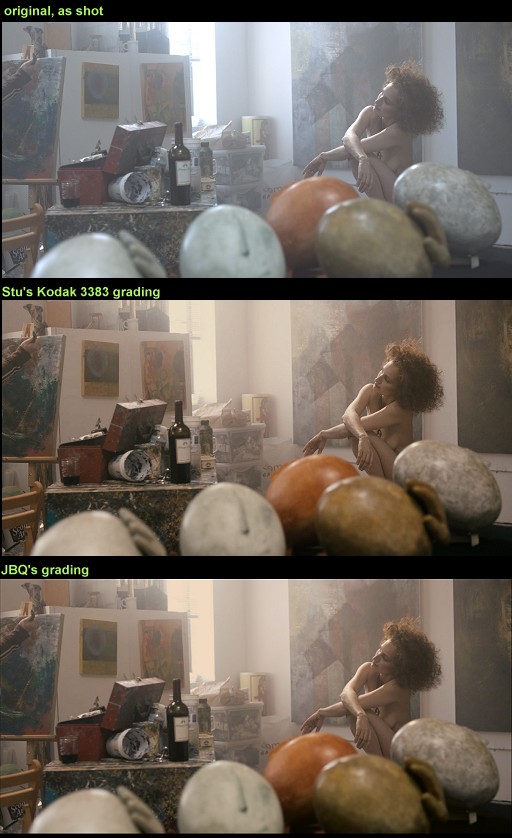
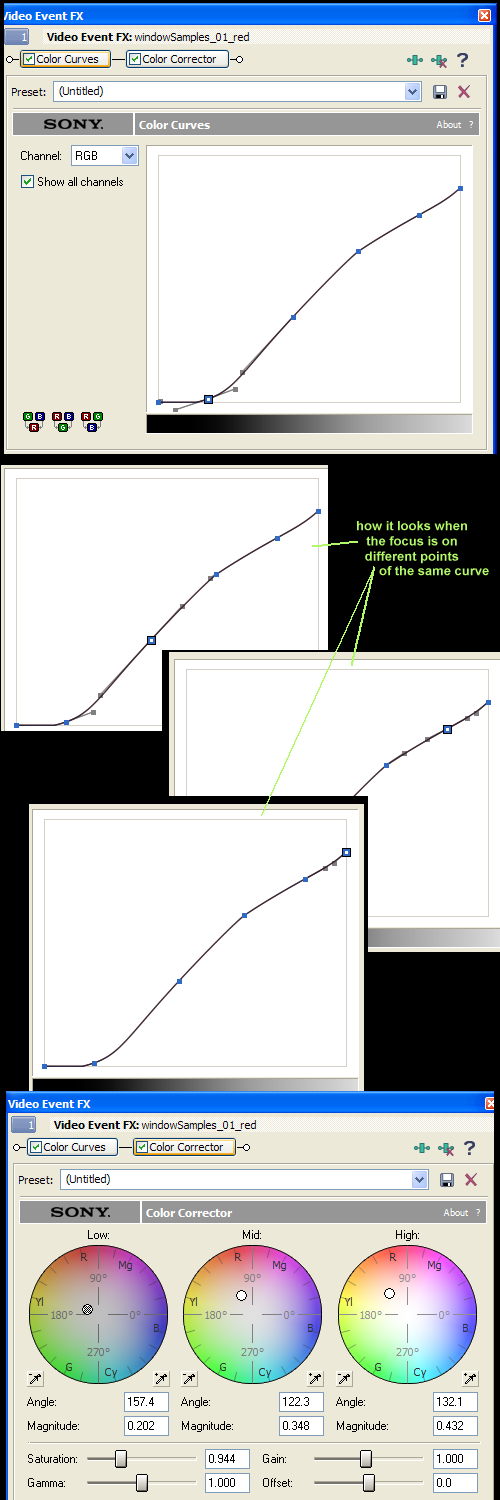
Stu “ProLost”, wrote a nice article about dynamic range and color correction last month. He posted a picture as captured from the RED ONE camera, and also posted his graded version, using a LUT that emulates the Kodak 3383 print film (that’s what you would usually use if you shot digitally but you want to transfer to film for a theatrical release). Naturally, I tried to reproduce the look by using only Vegas’ own tools (no Magic Bullet), but failed miserably. So I asked JBQ for a hand, and he spent almost an hour today working on it.
JBQ was able to get very close to the Kodak film look by using Vegas’ Curves, Color Corrector and the histogram as a guide (note: Vegas Platinum does not have a histogram, only Vegas Pro does). Please note though that Stu had the original 4k RAW frame to work with, while we only have a 720p rescaled JPEG. This means that the picture we had to work with had JPEG artifacts and far less visual information than the version Stu worked on, which is why we could recover far less information in the overexposed window. And yet, JBQ came very close to that look.
If you want the same film look on your films with a Canon consumer camera like the HV20 (you will have to slightly tweak the plugin values per scene, of course), you have to do the following:
1. Shoot in 24p with Cinemode. Cinemode’s look is dull for a reason.
2. Select “Neutral” on your camera’s color options. Remember, the more dull a picture is shot, the better it behaves when color graded. Over-saturated, sharpened, constrasty pictures (which is how consumer cameras shoot as by default) don’t color grade at all.
3. Get a good contrast filter. I would go for the Tiffen HDTV FX 52mm one, costs $200.
4. Lights, lights, lights and a light reflector. Buysome.
5. Use a gray card to set the custom white balance (never let the camera guess), and help the camera expose correctly.
That setup should give you a dull enough, bright enough, low-contrast enough, image to be able to work properly afterwards during color grading and get closer to the film look.
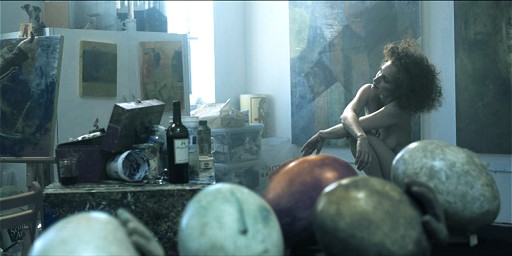
Update: And here’s the “Live Free or Die Hard” blue-green look:
Posted on Thu 27 Mar 2008 at 9:11 PM PST. Filed under .
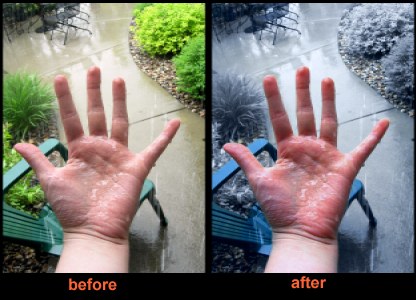
ProLost, the author of the DV Rebel Guide, wrote After Effects and FCS tutorials on how to preserve natural skin tones when the rest of the scene has an extreme blue color grading. This blue tint color is what’s in fashion lately for movies. Yes, there is color fashion for films too, which is one of the reasons movies from 10 years ago look different than today’s films.
So, I am providing below a way to get the same look, using Sony Vegas. Because I like my tutorials to be accessible also to users that don’t have the Pro version of Vegas, I will not use the “Color Corrector Secondary” plugin, which is the normal way of doing these kinds of things. Another thing to remember is that each scene is different and it requires changes on the values of the plugins. You can’t just copy/paste the values throughout a film and expect to have a constantly good-looking image.
1. Download, install and load Aav6cc to your timeline clip (free download. On Vista you might have to install it as “Run as Administrator”).
On it put the saturations of Red, Blue, Cyan to 80. All other colors’ saturation to -90. Cyan’s Hue to -16. Lightness of Blue and Cyan on -64.
2. Load the “Color Corrector” plugin on your clip (not “Secondary”, comes with Vegas).
All three Angles to 315. All three Magnitudes to 0.330. Saturation 1.000, Gamma 0.900.
The above settings had the following results, but as I said, you need the right moody footage and the right modified settings each time to get this working for all your clips.
Update: Wow, what a small world this is! So I made a search on FlickR for CC-BY pictures of “rainy days” for the purpose of this tutorial, and I decided to use the above one from “romainguy”. Ten minutes later my husband said “Romain takes nice pictures, I will have to talk to him about photography”. And I replied sarcastically “why, you know him? :P”. And he said “yes, he sits three cubes down from my desk at Google!”. Holy crap.
Update 2: If you have Magic Bullet installed, load the Aav6cc plugin and modify the saturation of Red to 90, Yellow to 50. And then use the Magic Bullet template “Berlin”, but change its “Do post: contrast” to 20.
Posted on Thu 27 Mar 2008 at 5:05 PM PST. Filed under .
I’ve talked many times on my blog about the mountainous village I am coming from, Skiadas. A friend, who originates from the same village too (and currently lives in Athens), sent me a URL with a picture of the village. My parent’s home is not visible in the photo though, as it’s on the left side (only half of the village is shown in the pic). I lived less than 6 years there, ages 2-4 & 9-12, but it’s what I consider “home” (I was born in Athens, then moved to the nearby city Preveza, and later we stayed for good in Louros, a nearby town). When I close my eyes at night, that’s the only place I find myself into.
My favorite times there were during Easter. So many people would come back to the village from the surrounding cities, Athens or even Germany. For at least a week the village would be buzzing with 400 people who came back to their birthplace for the biggest celebration of Orthodoxy. Everyone knew everyone too, so there was not much you could do to escape the social requirements of being presentable and well groomed at all times.
And at the Easter night, at 12 AM, either at the Saint Paraskevi or Saint Christopher church, the mass would take place and the whole village would be there. All 400+ of them (not all fit inside the church). The lights would go off, and the priest would share his candle flame with someone, and the flame would spread among the crowd. Soon, the only light available would be candle light. Some people would use fireworks in the later times, but originally in my village some men would usually used their guns to shoot towards the sky (hehe…).
Then, we would go home and feast on either fried, or as a soup, lamb/goat intestines (the animal was given to us from my uncle, as in my own family we never herded big animals as my father is a house builder instead). I preferred them fried personally, with home-made fries (potatoes usually from our garden, stored from the previous year). And that felt as an amazing food, as we had to fast for at least a week before Easter (a strict vegan diet, while on Good Friday we were not allowed to eat anything oily either — some people would fast like this for 40 days, e.g. both my grandmothers).
And the next day, what a feast with our extended family! Greek easter lamb (or goat). Best. Food. Ever. Food coma for the rest of the day. And many bathroom visits too.
But the day after Easter, the village population would go down to about 100 people again, and today, only about 35 people live there. Since most inhabitants left the village at around 1990, the school was abandoned, and none of the six churches have a mass anymore as there is no priest to fill in. An abandoned village, just like so many others in the Epirus region. Mass migration to big cities to seek better employment and a better life. Life at these villages is hard in the winter…


